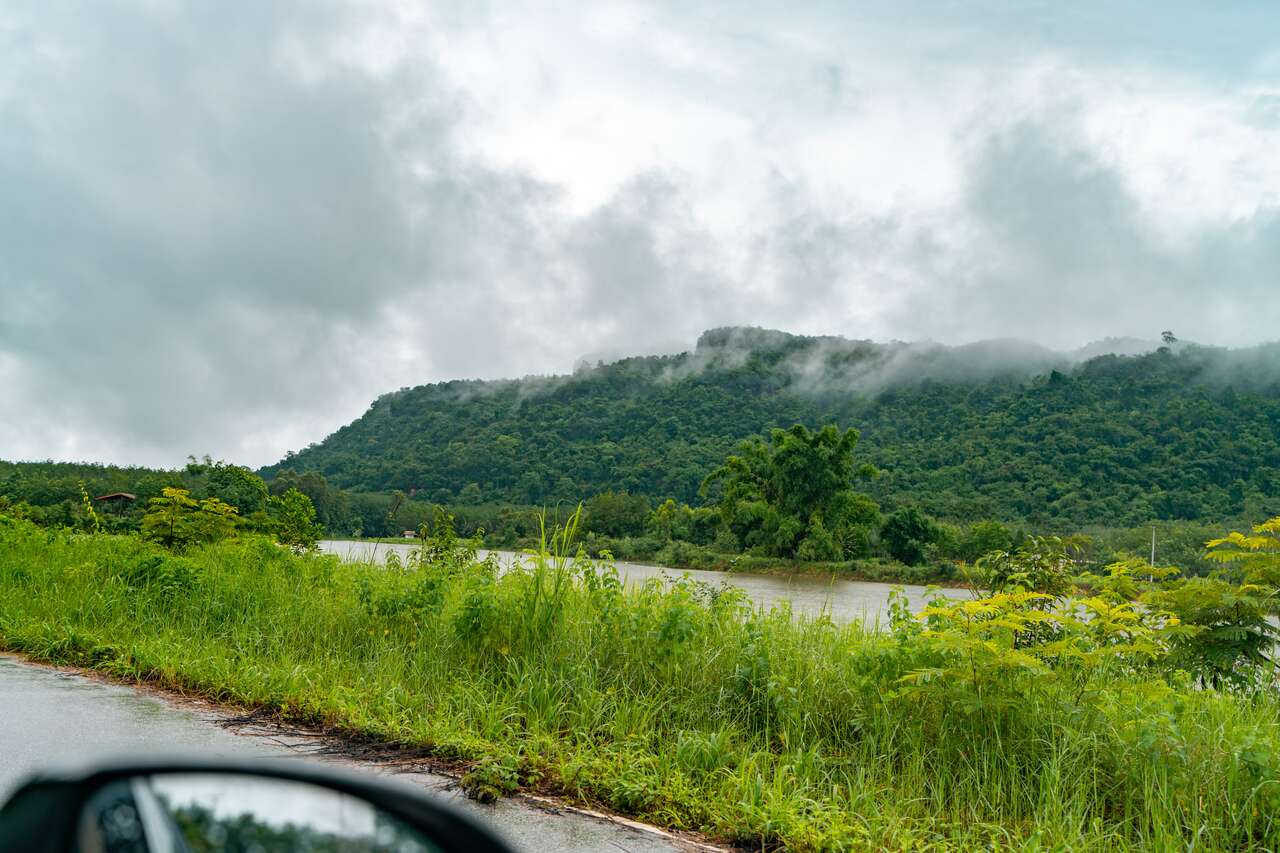
As one of Thailand’s newest provinces, officially separated from Nong Khai in 2011, Bueng Kan is a mountainous region along the Mekong River that’s quickly becoming the new adventure hotspot of Isaan. The province has become a sensation among Thai tourists thanks to its dramatic landscapes, including mountains, caves, and waterfalls.
Some of my favorite things to do here include visiting the Three Whale Rock, a striking formation that resembles three massive whales; hiking to Naka Cave, one of the most epic treks in Thailand; and exploring a number of breathtaking waterfalls you can actually swim in, all of which we’ll cover in this travel guide.
If you're looking for a fun adventure in Isaan, this is the place to be. Here's a complete travel guide to Bueng Kan. Let's start planning, shall we?

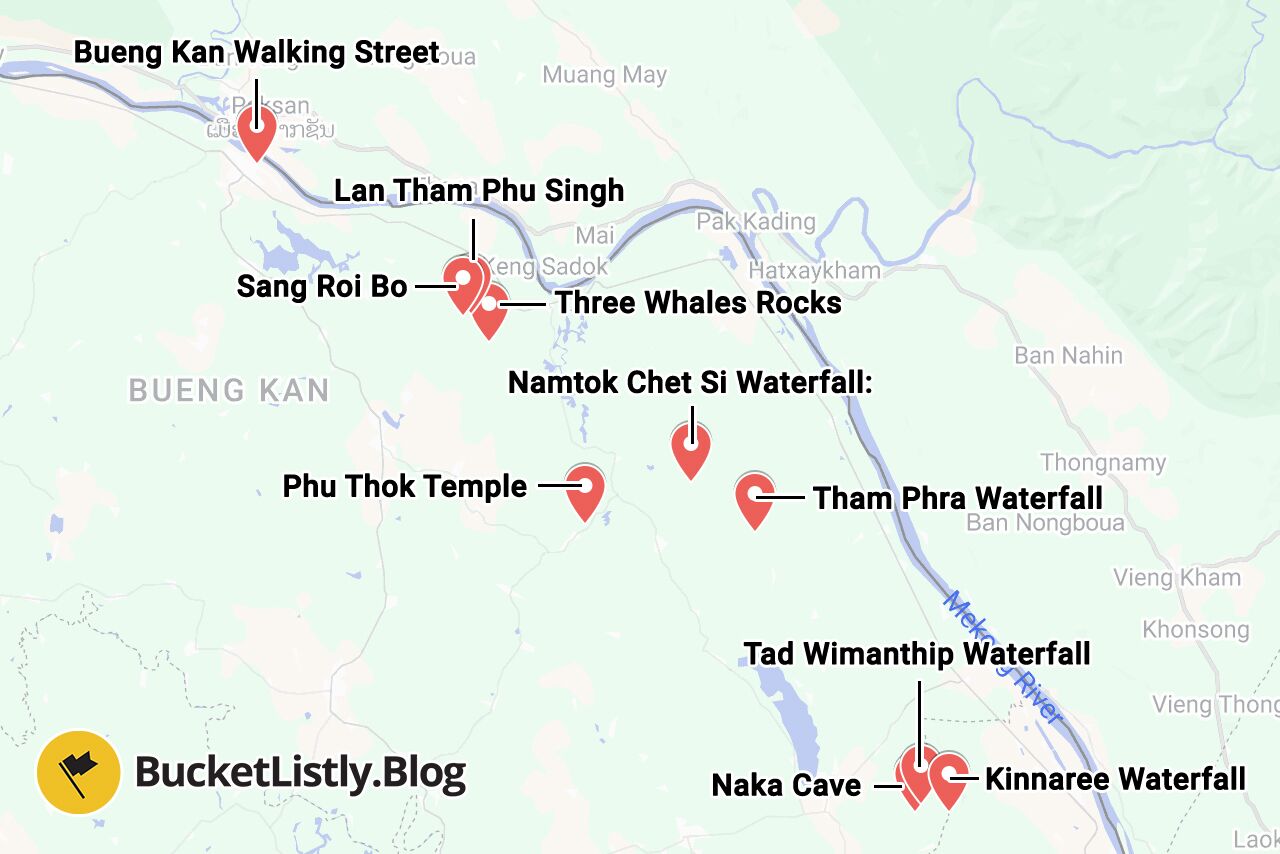
Bueng Kan Things to Do Map
Quick Summary
| ♥️ Must Visit: | Be Blown Away by the scale of the Three Whale Rocks |
|---|---|
| 👍 Must Do: | Hike Around Phu Thok Temple |
| ☀️ Great Half Day Trip: | Spend half a day exploring Naka Cave |
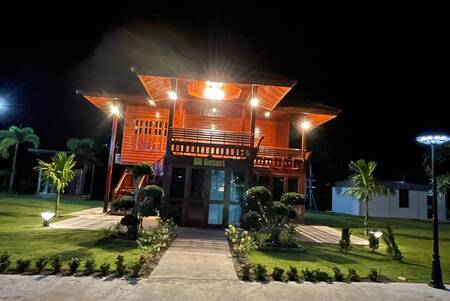
| 🛌 Place to Stay: | HR Resort |
| 🏃♂️ Getting around: | Car |
10 Best Things to Do in Bueng Kan
1. Be Blown Away by the scale of the Three Whale Rocks
- 📍 Location: Three Whale Rock [Map Link]
- 🕐 Opening Hours: 5 AM - 5 PM
- 💰 Entry Fees: 100 THB (~3 USD)
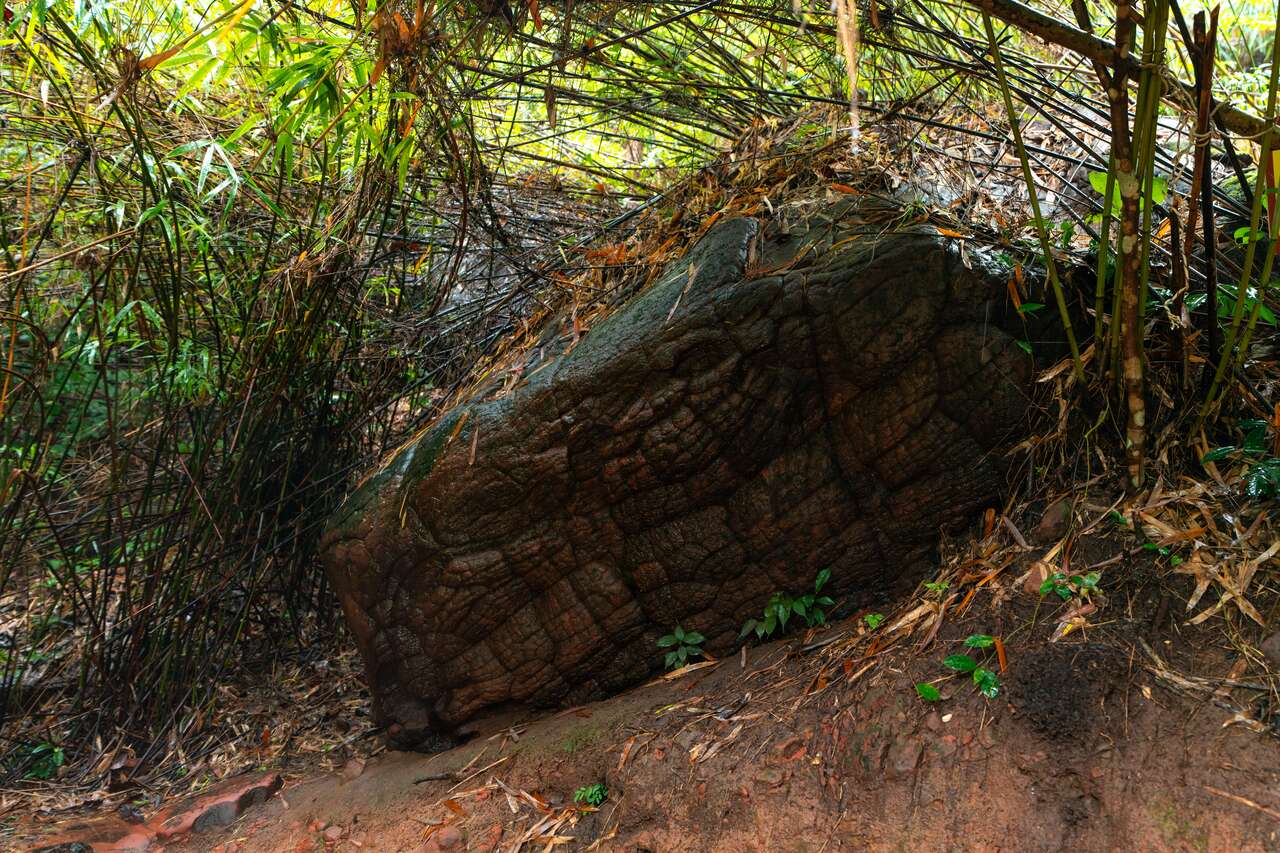
One of the most famous attractions in Bueng Kan is the Three Whale Rock or as we call it in Thai, Hin Sam Wan. It is exactly what the name suggests. It's a collection of 3 massive rock formations that resemble whales, located deep within a forest park amidst the thick jungle of Bueng Kan.
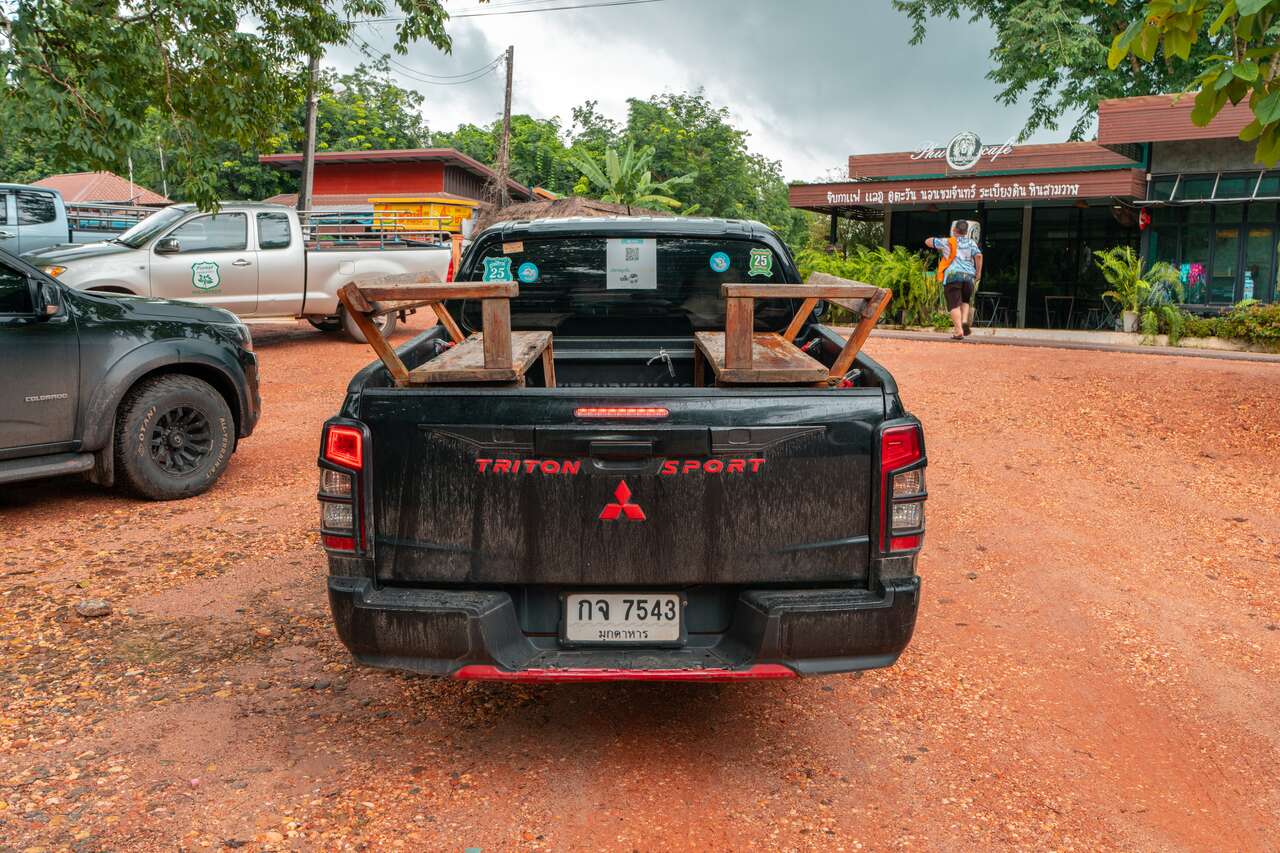
To get there, you’ll first need to drive to the forest park’s parking lot and leave your car there. At the park office, you’ll pay an entrance fee of 100 THB. After that, you have two options: you can either hire a truck for 500 THB to take you to Three Whales Rock and other sites like Lan Tham Phu Singh and Sang Roi Bo, or you can wait for other tourists to arrive and share the 500 THB cost with them.
Another option, which I saw a foreigner do, is to walk to the rocks without hiring a car. It’s doable, but the hike takes about 2 hours each way, as the Three Whales Rocks are around 3.2 km from the entrance, with some uphill and downhill sections. I decided to wait for other tourists to share a car with, which only took about 15 minutes on a weekday. It’s usually quicker on weekends, though it can get more crowded. I ended up joining a group of four and paid just 100 THB for the ride.
- Panicha Ville Hotel (Budget)
- HR Resort (Mid-Range) 👍 Top Pick
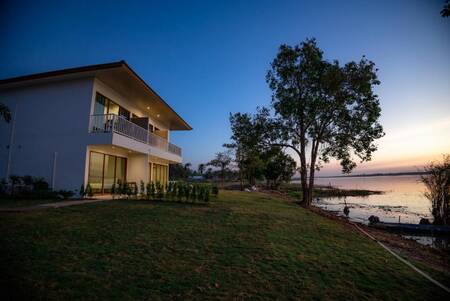
- LAKE HOUSE Naka Cave (High-End)

Once you get on the pickup truck, the driver will take you to a few other spots before arriving at Three Whales Rock. Only two of the rocks are accessible on foot, but that’s more than enough to appreciate just how massive they are. The site is said to be best appreciated from the air, so much so that the forest park even offers a drone photography service, which costs around 1,000 THB.
If you have your own drone, you’ll need to purchase a drone permit at the ticket office before your visit. You used to be able to fly drones freely here, but that’s no longer the case. I ended up not flying mine due to the hassle and extra cost.
Plus, we only had about 45 minutes at the rock, and walking between the two main formations takes time. There are also other viewpoints around the rocks, like this one, which is especially stunning at sunrise.
The trip also includes stops at Sang Roi Bo and Lan Tham Phu Singh, which are covered in this guide as well. Expect the entire visit to take around 2 hours. The park is open daily from 5 AM to 5 PM, so you can even catch the sunrise if you like. Entrance is 100 THB per person, and a guide service costs 500 THB per car; each vehicle can accommodate about 5 to 6 people.
Where to Stay in Bueng Kan?

2. Check Out the View from Sang Roi Bo
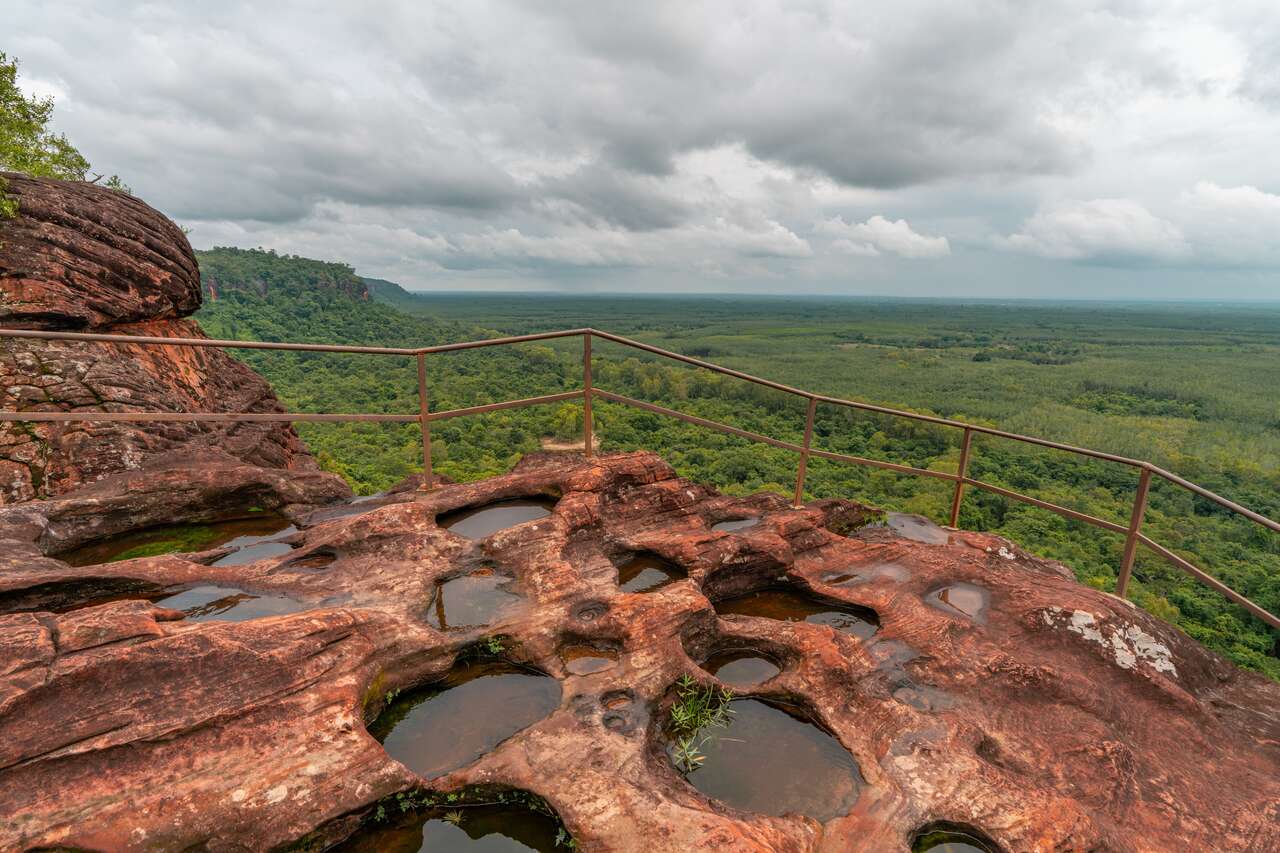
- 📍 Location: Sang Roi Bo [Map Link]
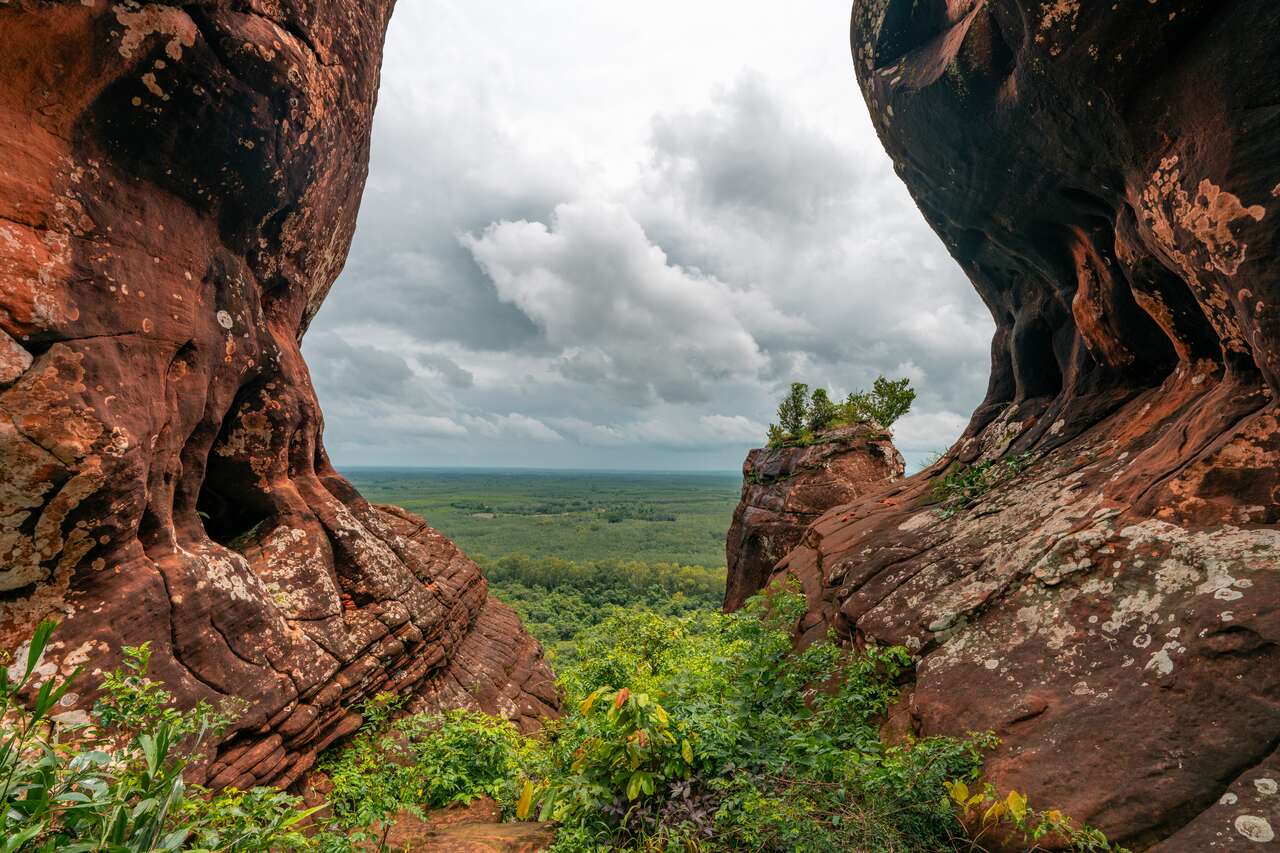
As part of the Three Whales Rock tour, you’ll also visit Sang Roi Bo, a small but fascinating stop known for its thousands of small holes and depressions carved into a large limestone plateau. The name Sang Roi Bo roughly translates to “Hundred Holes Field” in Thai, an apt description of the unique landscape you’ll see here.
The tour usually stops at Sang Roi Bo toward the end of the trip, giving you about 10 minutes to explore. It’s a short walk from the road to the open plateau, where you’ll find rock holes of all sizes scattered across the surface.
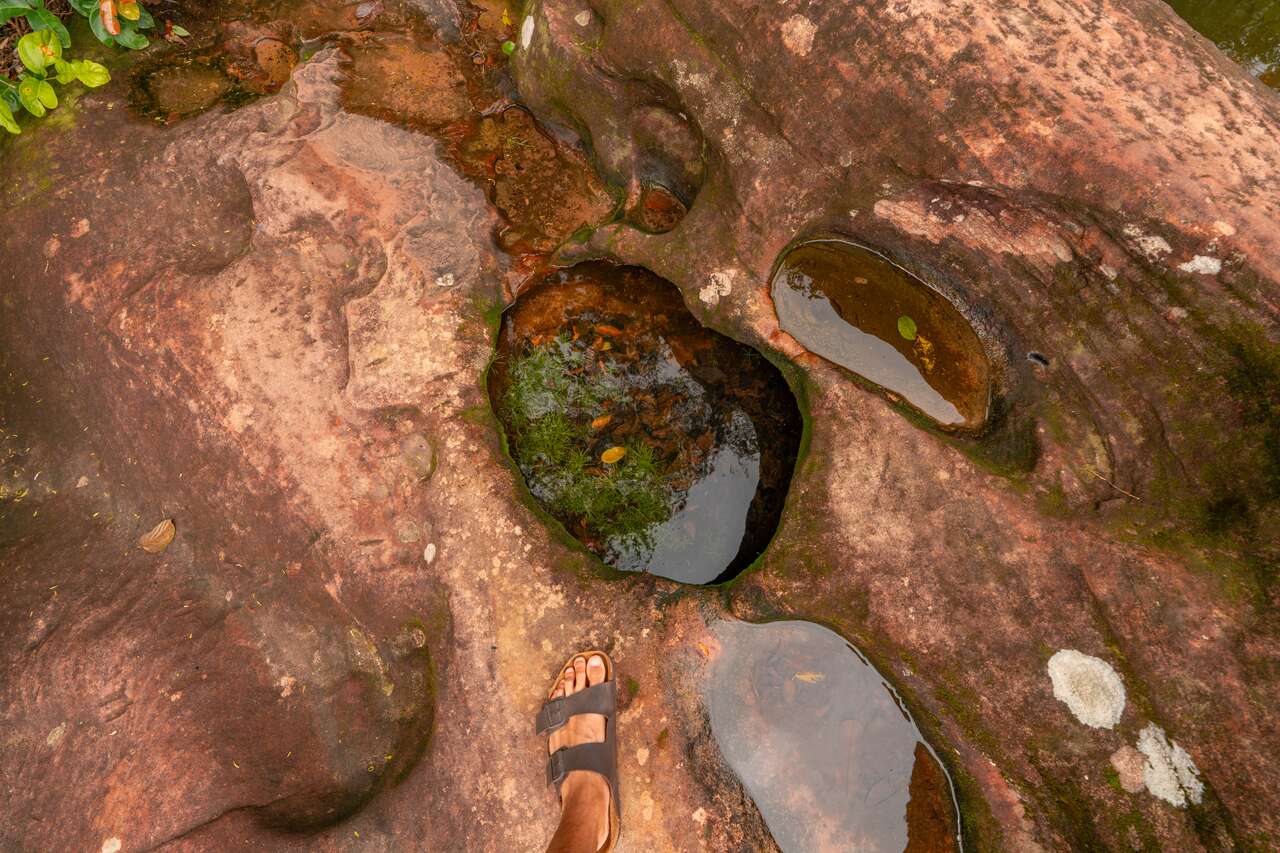
If you visit during the rainy season, like I did, these holes fill with water, creating mini ponds dotted across the plateau, a truly unique sight. The view from Sang Roi Bo is equally impressive, with vast, flat Isaan countryside covered in lush vegetation stretching out before you. Be sure to include Sang Roi Bo when you visit the Three Whales Rock.
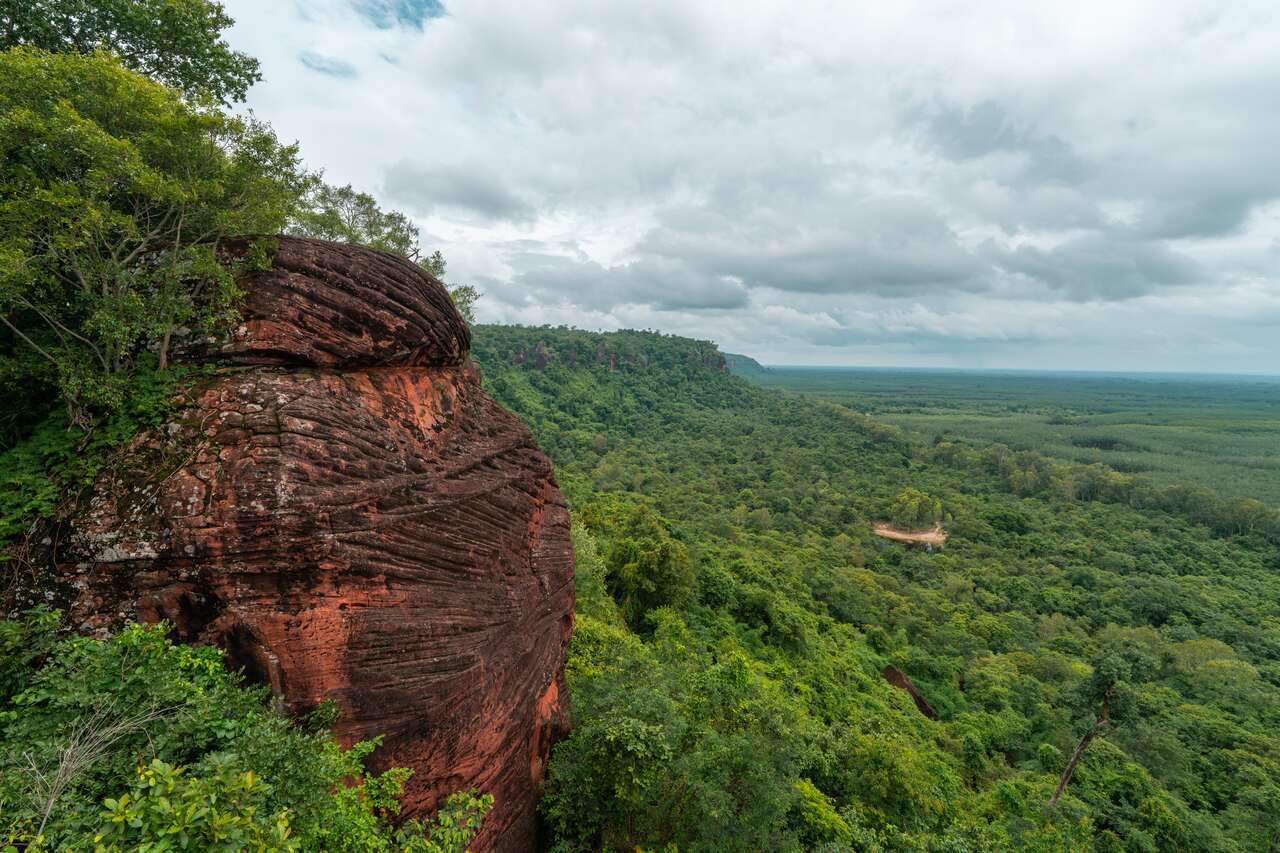
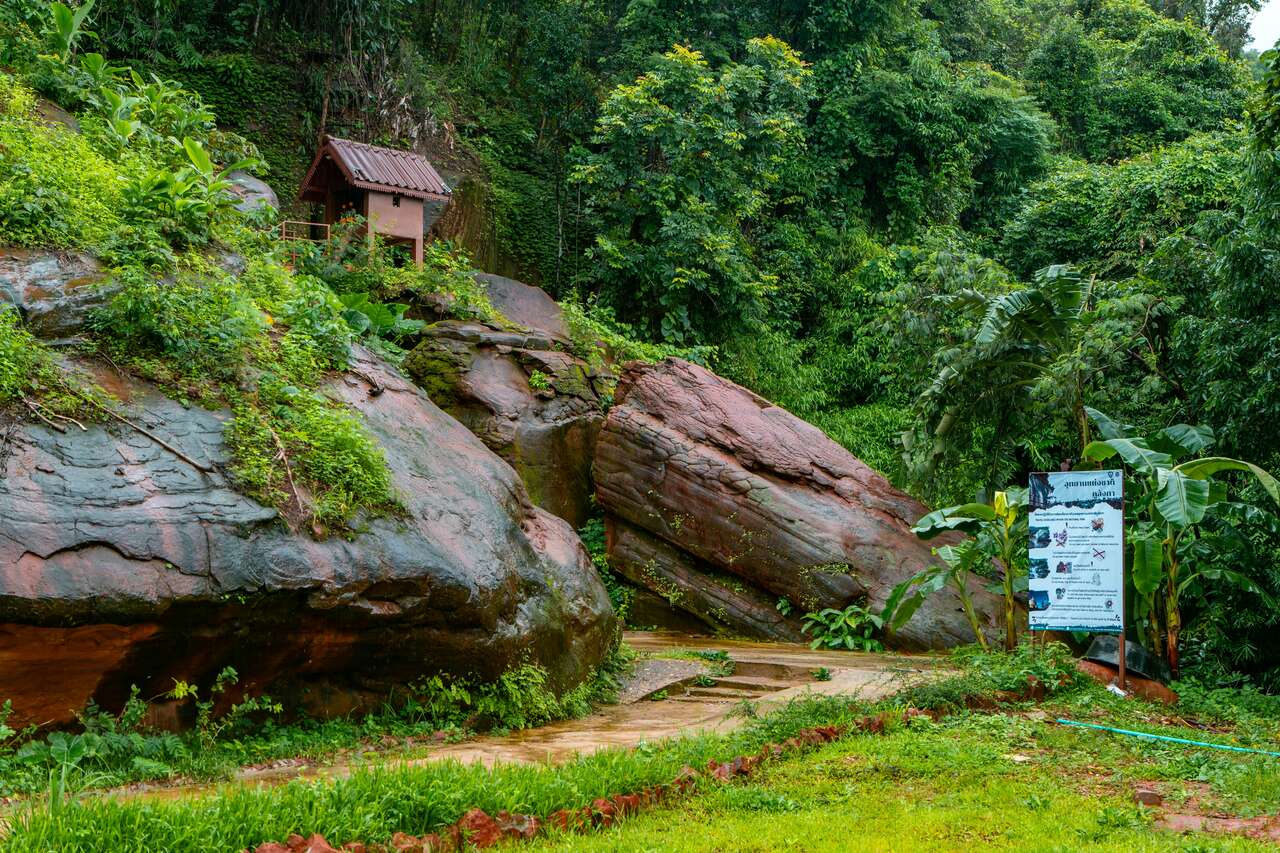
3. Visit Lan Tham Phu Singh
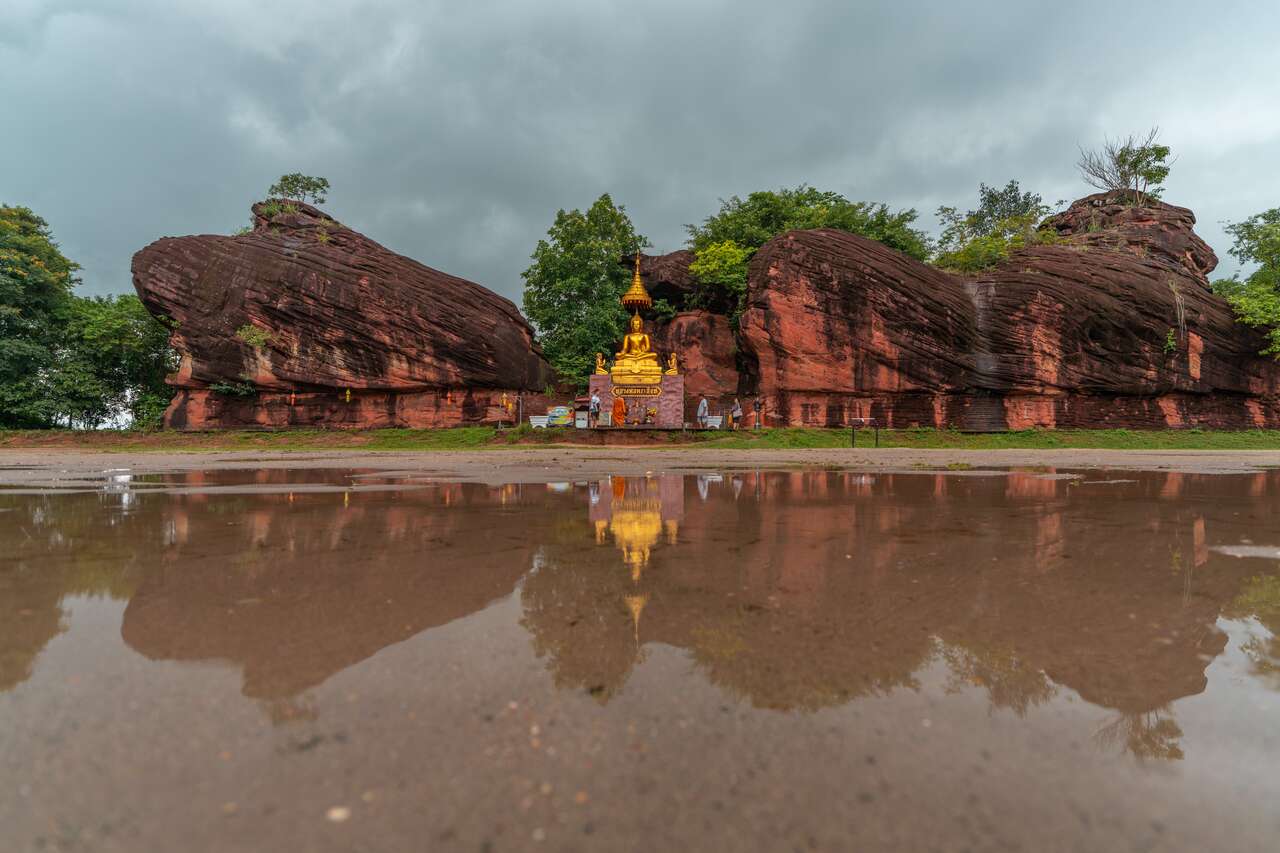
- 📍 Location: Lan Tham Phu Singh [Map Link]
Another stop along the Three Whales Rock route that you shouldn’t miss is Lan Tham Phu Singh, a scenic viewpoint featuring a rock formation that’s said to resemble a sitting lion, though I’ll admit, it took me a moment to see it! 😅 In my photo, you can see it a bit off to the right.
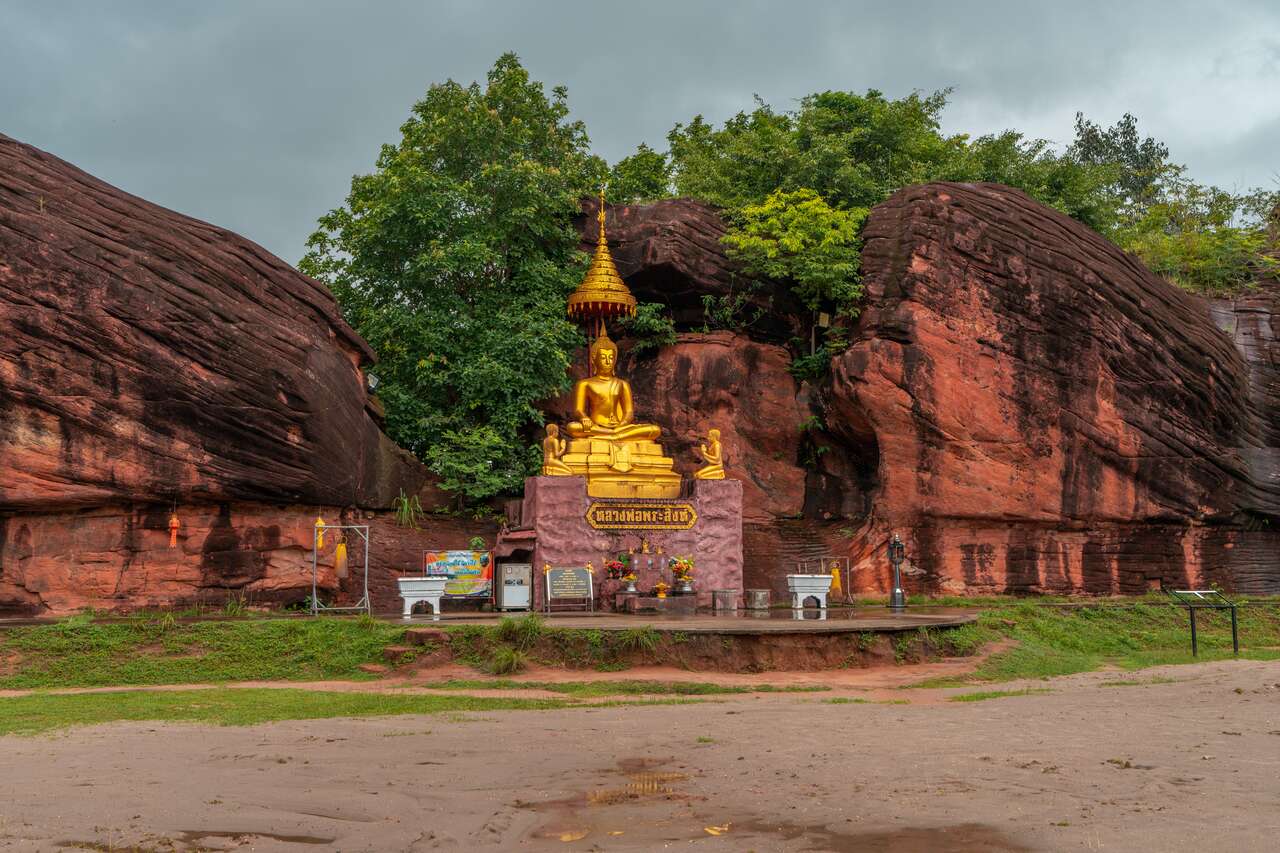
There’s also a small shrine here, and Three Whale Rocks tours often stop at this spot first to allow local visitors to pay their respects. It’s a quick visit, but a beautiful and peaceful one. So whether you’re joining the tour or walking the route on your own, be sure to stop by Lan Tham Phu Singh and take in the view.
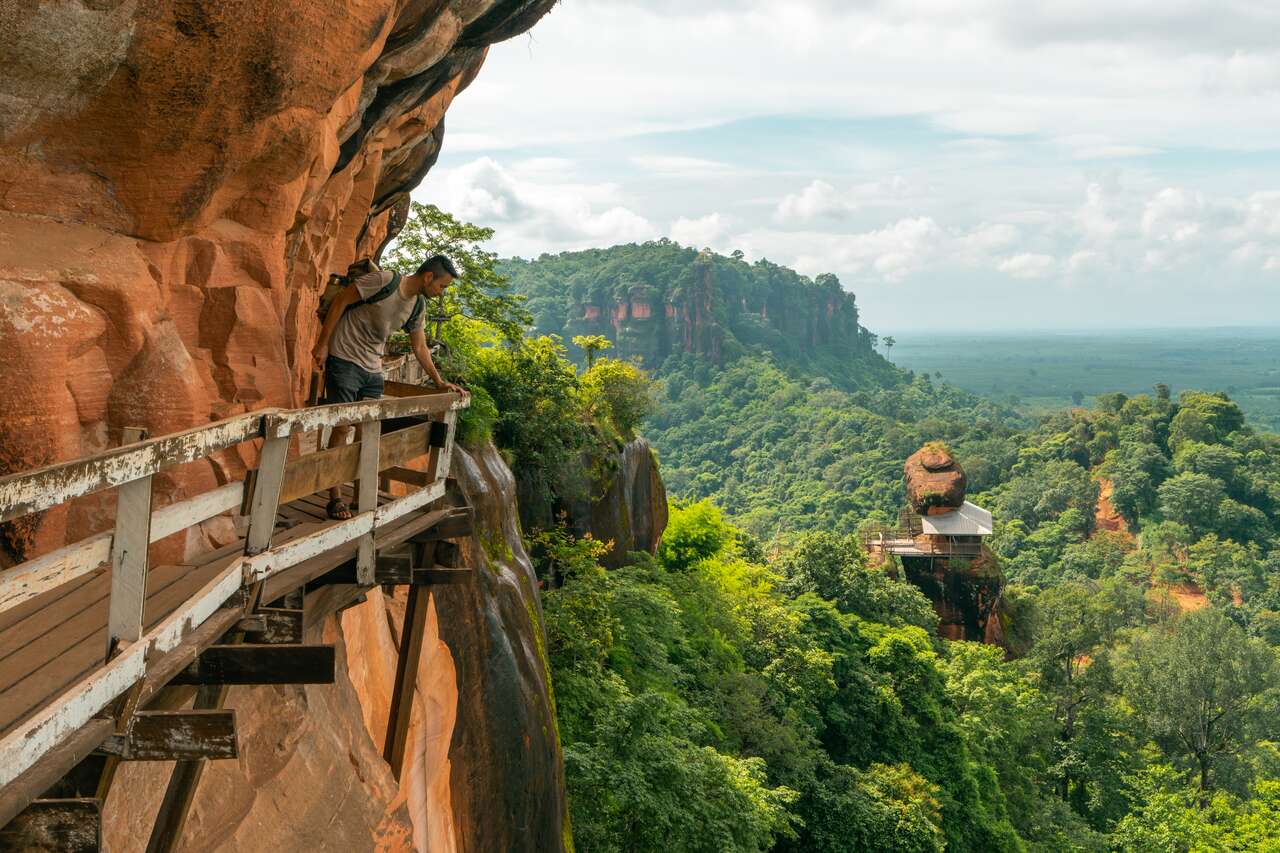
4. Hike Around Phu Thok Temple
- 📍 Location: Phu Thok Temple [Map Link]
- 🕐 Opening Hours: 6:30 AM - 5 PM
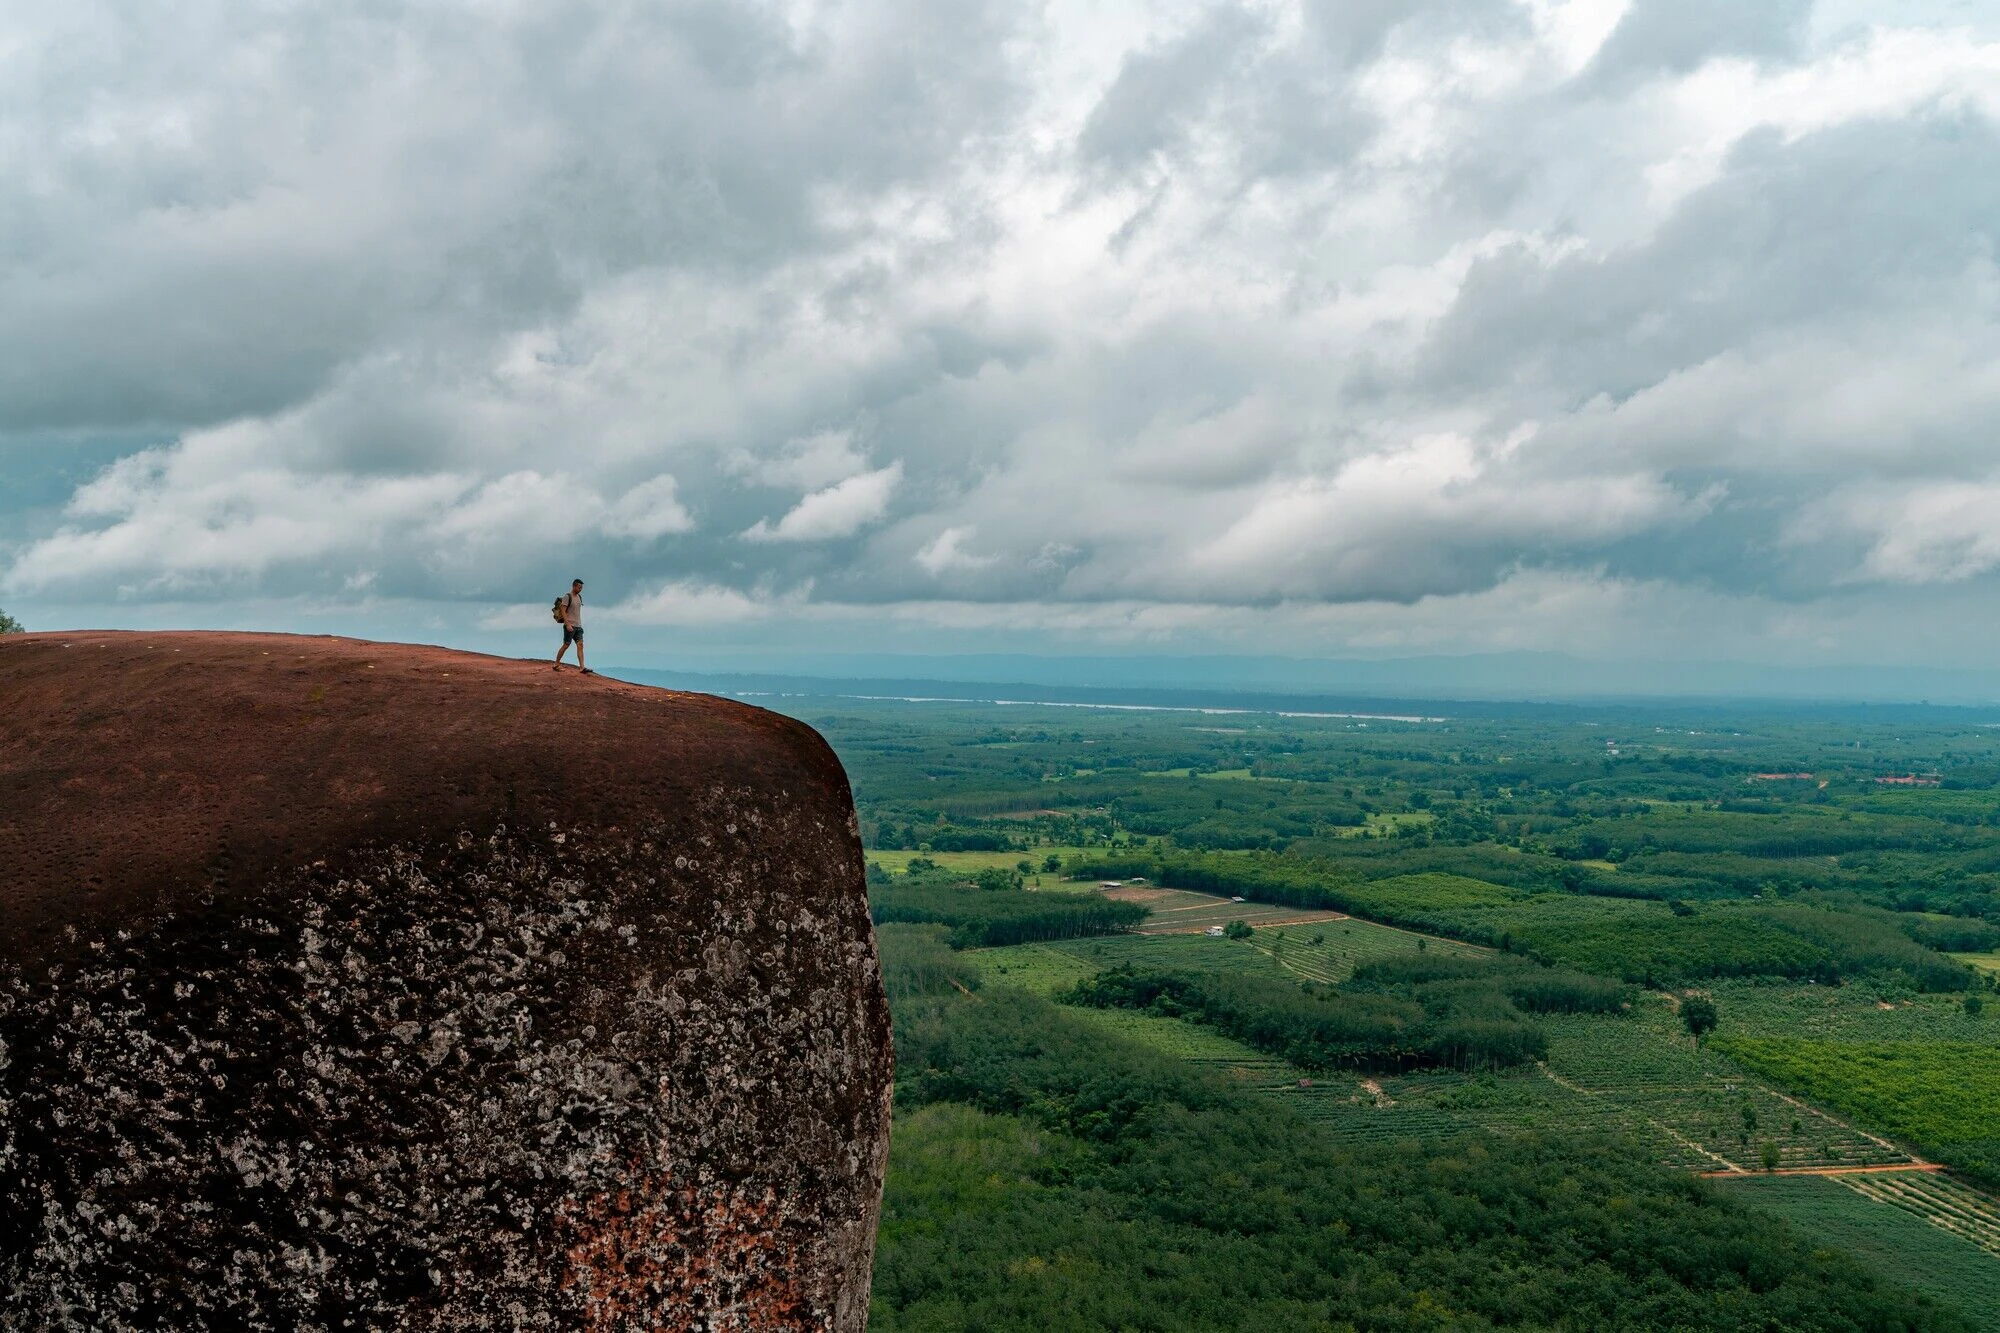
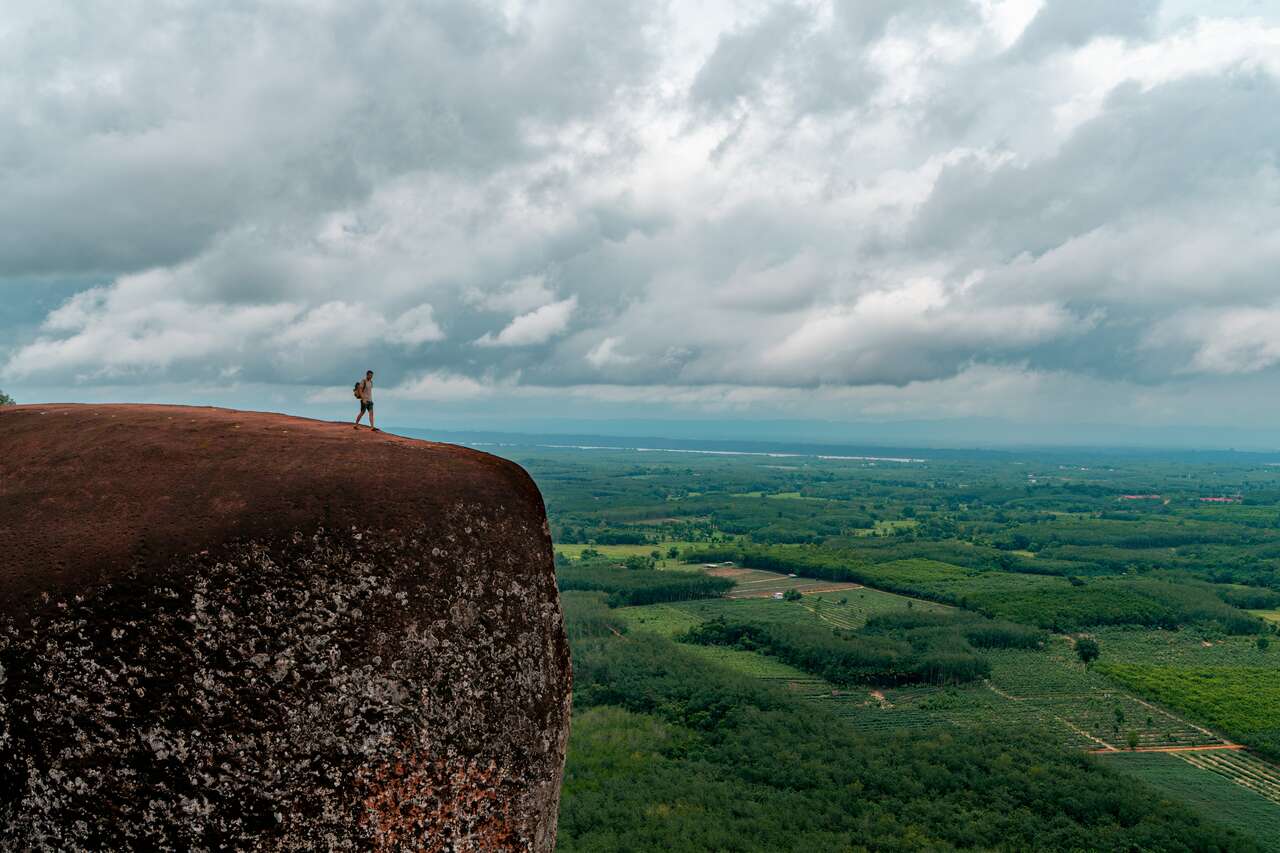
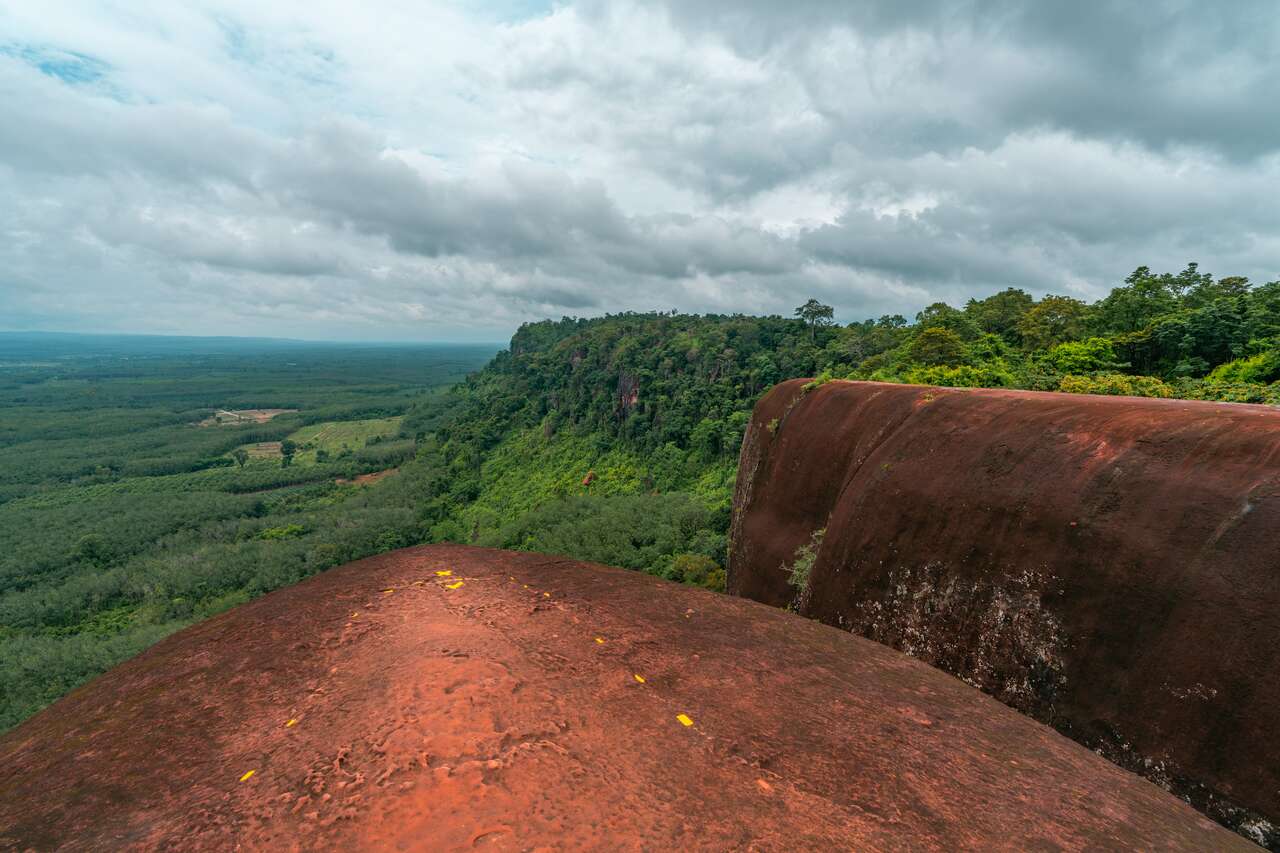
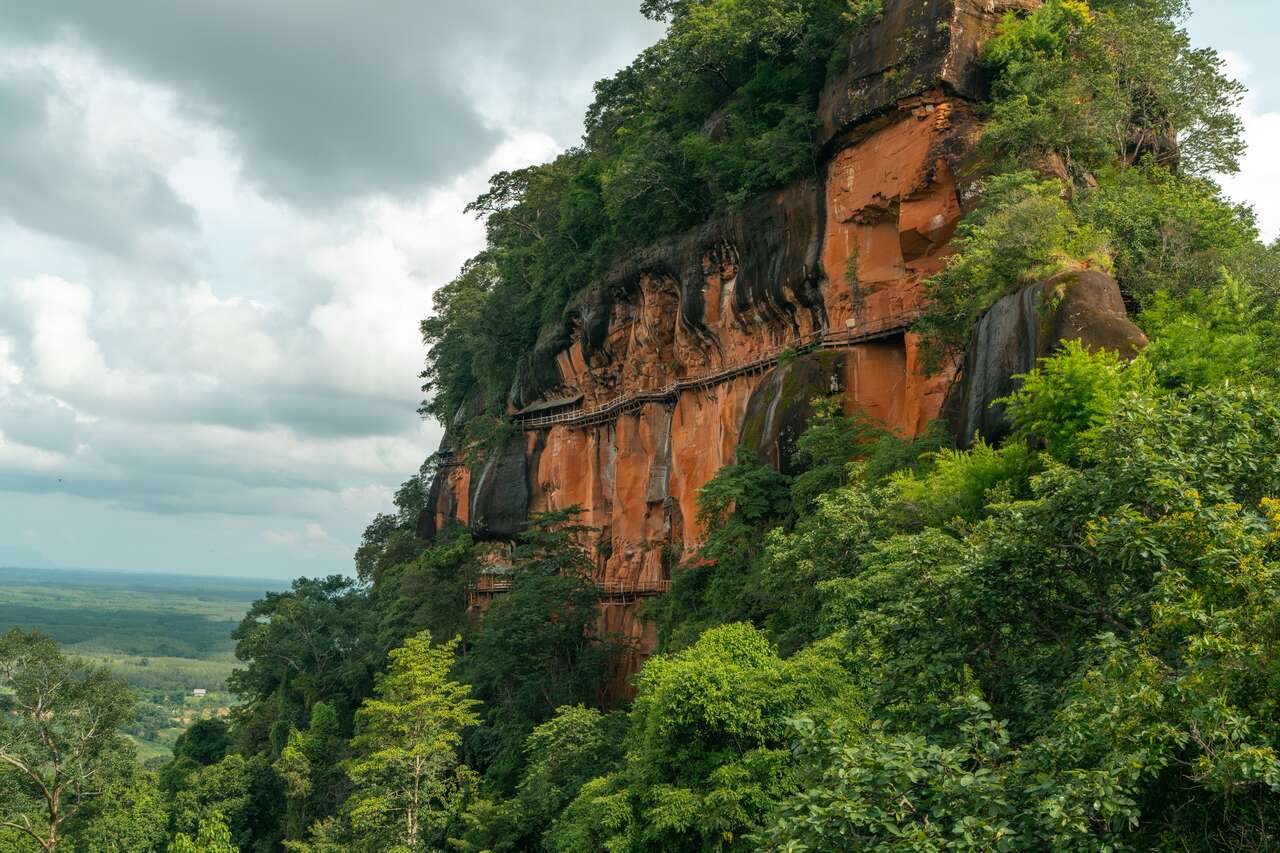
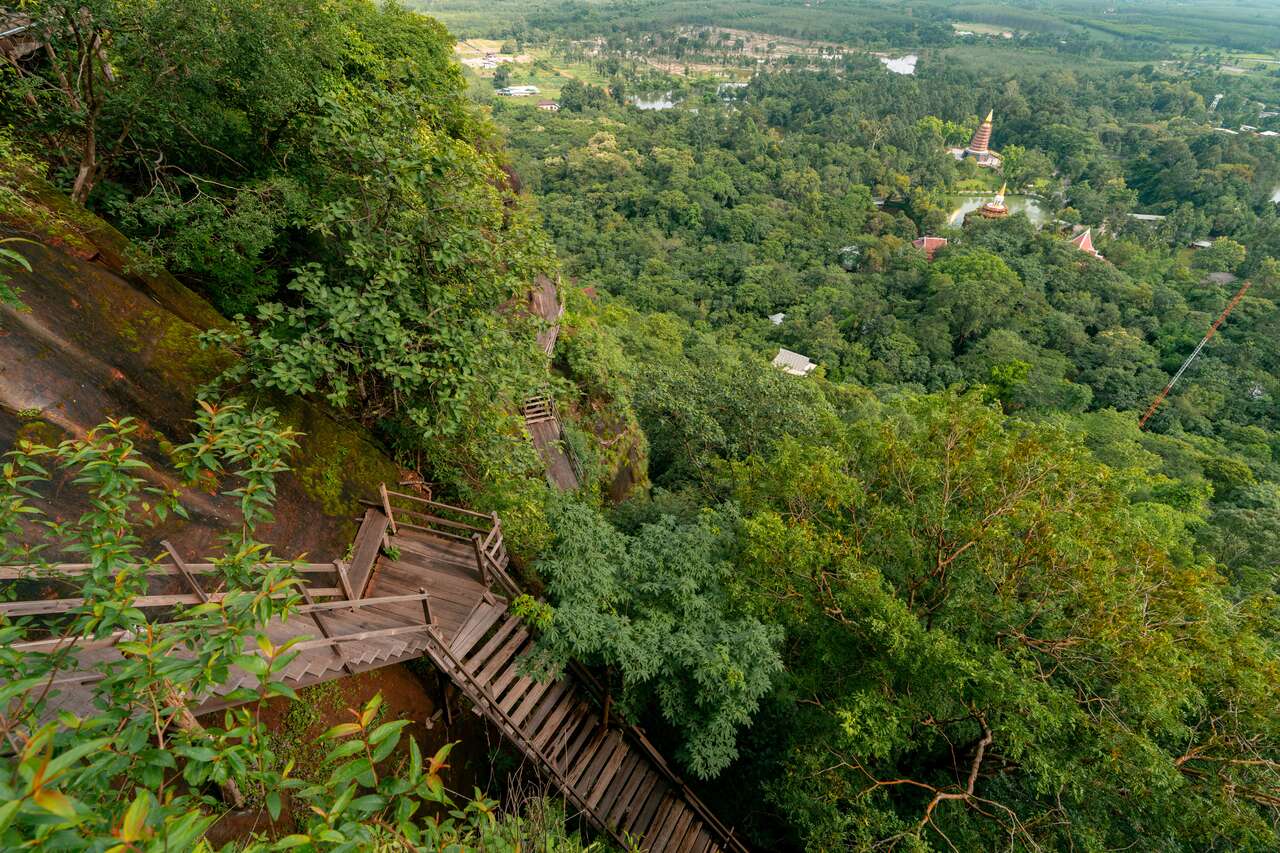
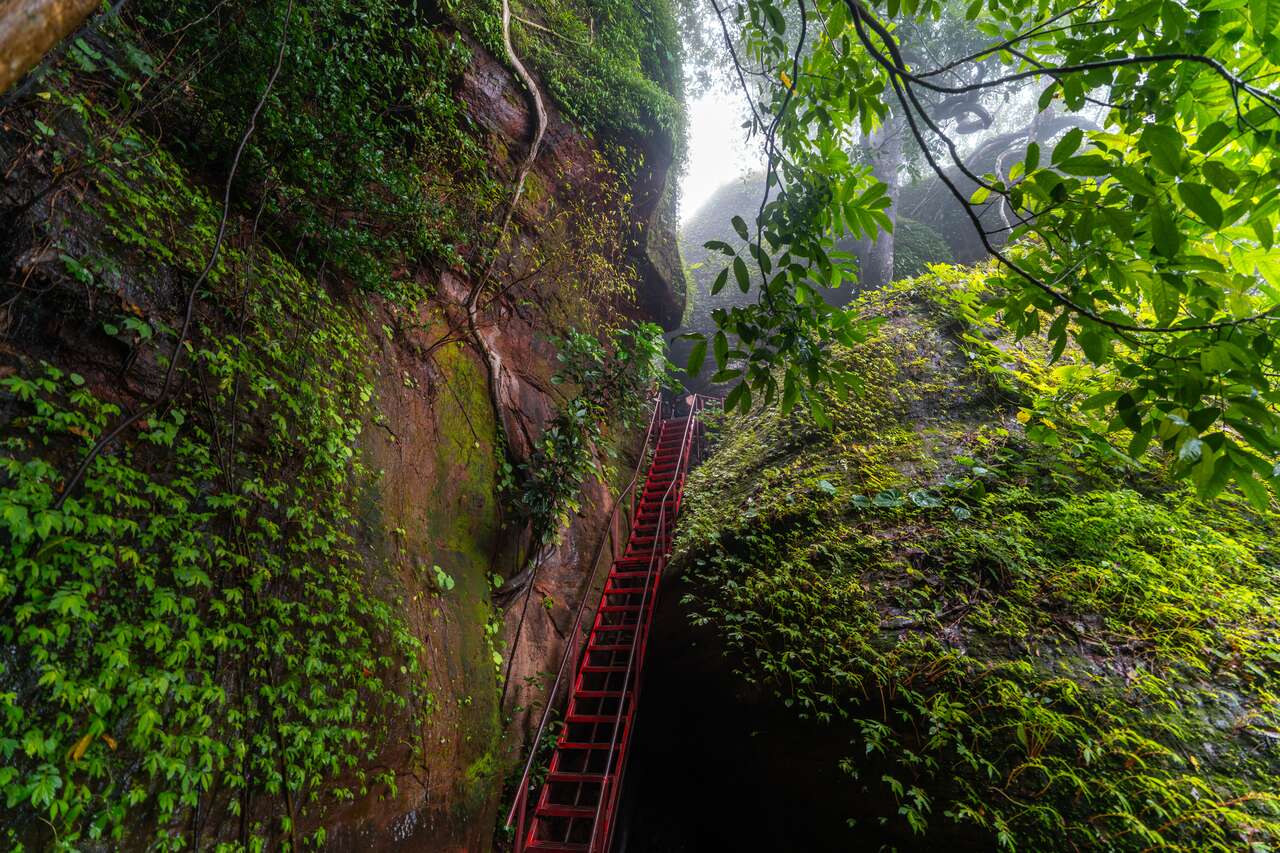
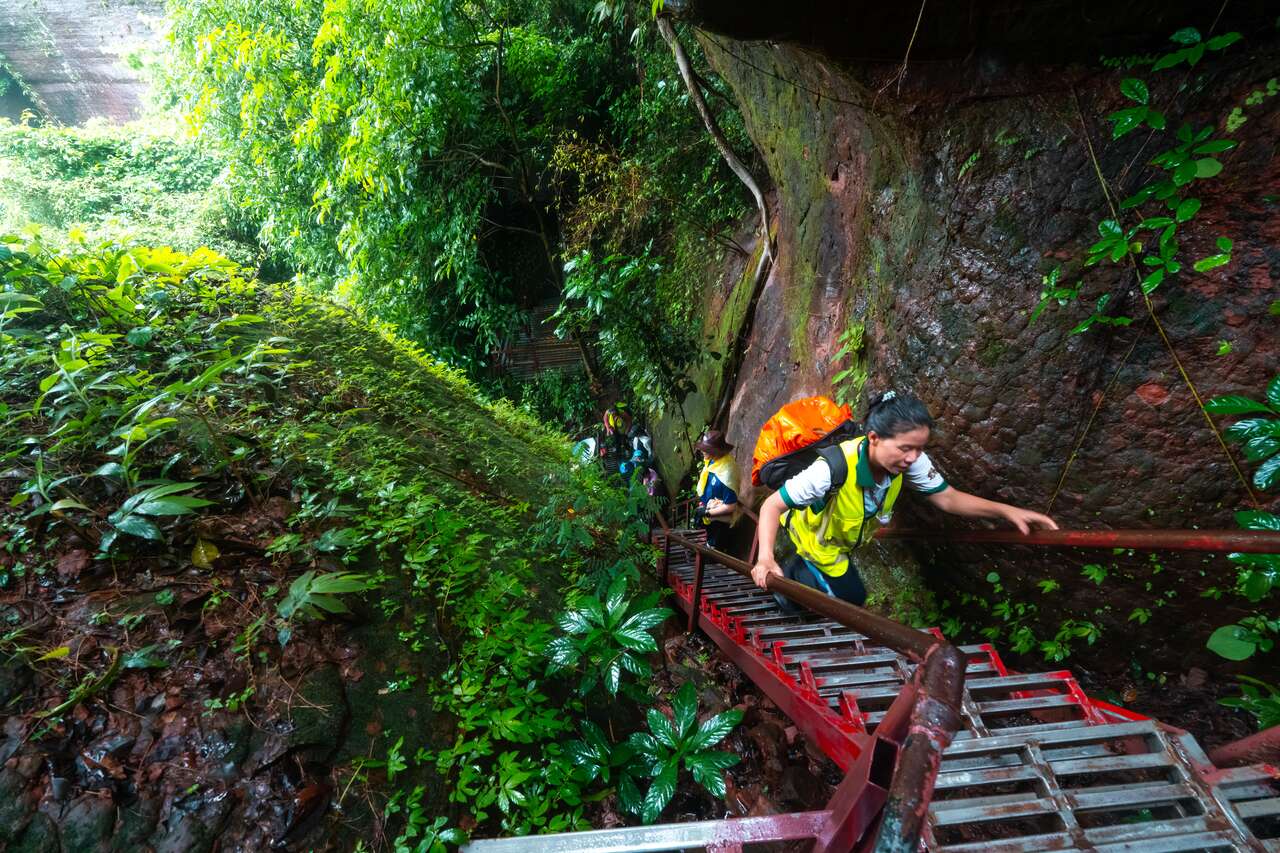
Phu Thok Temple is one of the most stunning hiking spots in Bueng Kan, and one I had been eager to visit ever since I saw a photo of its wooden elevated walkway clinging to the side of a mountain. The image was part of a tourism campaign released after Bueng Kan became its own province in 2011, and it instantly put the temple on my bucket list.
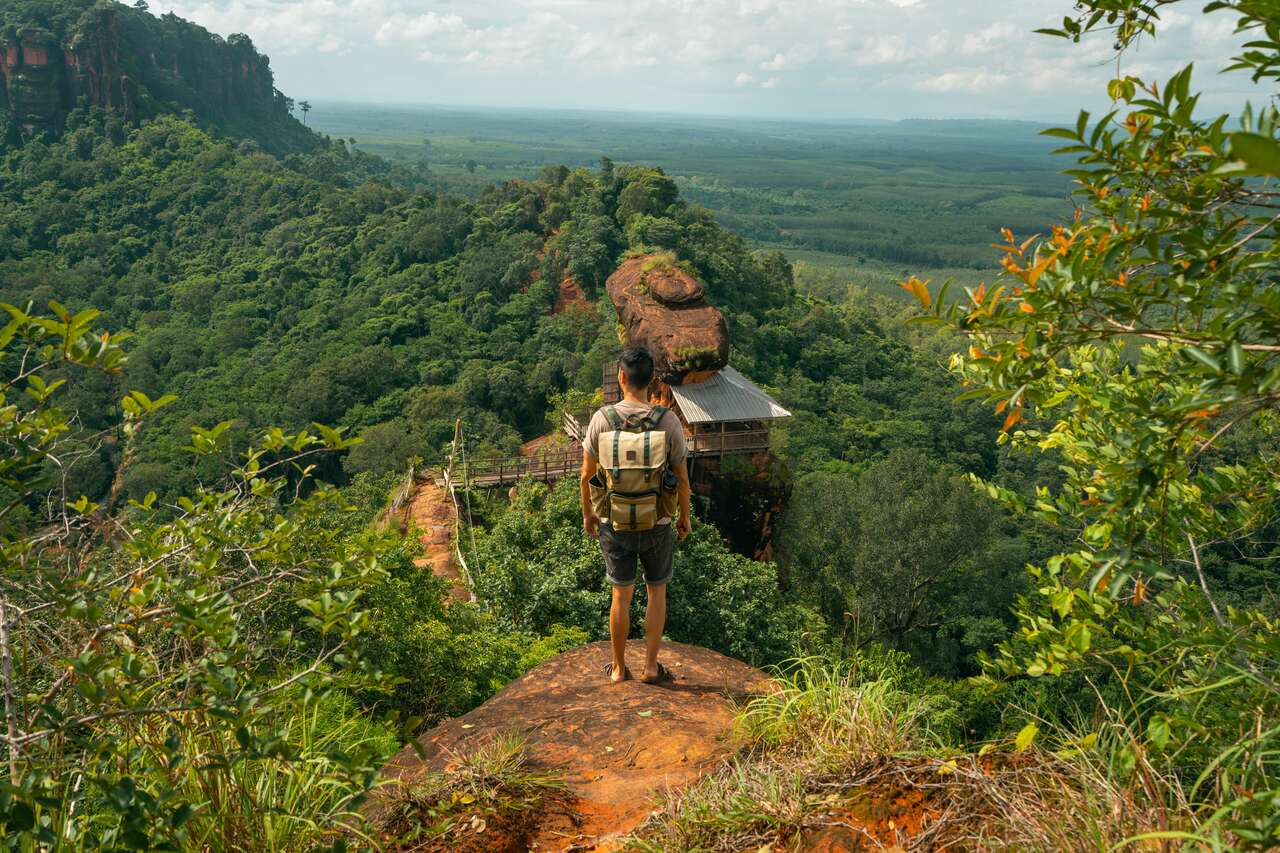
When I first saw press photos of this place, I couldn’t believe it was in Thailand. With its wooden walkway, towering rocky cliffs, and red-hued mountain, I assumed the photos were taken in China or Taiwan. So imagine how excited I was when I realized it was actually right here in Thailand!
Phu Thok is the name of the mountain, and at its base sits a forest temple established by a highly revered local monk. It was through their dedication and donations from the surrounding communities that this incredible cliffside walkway, which wraps around the entire mountain, was constructed.
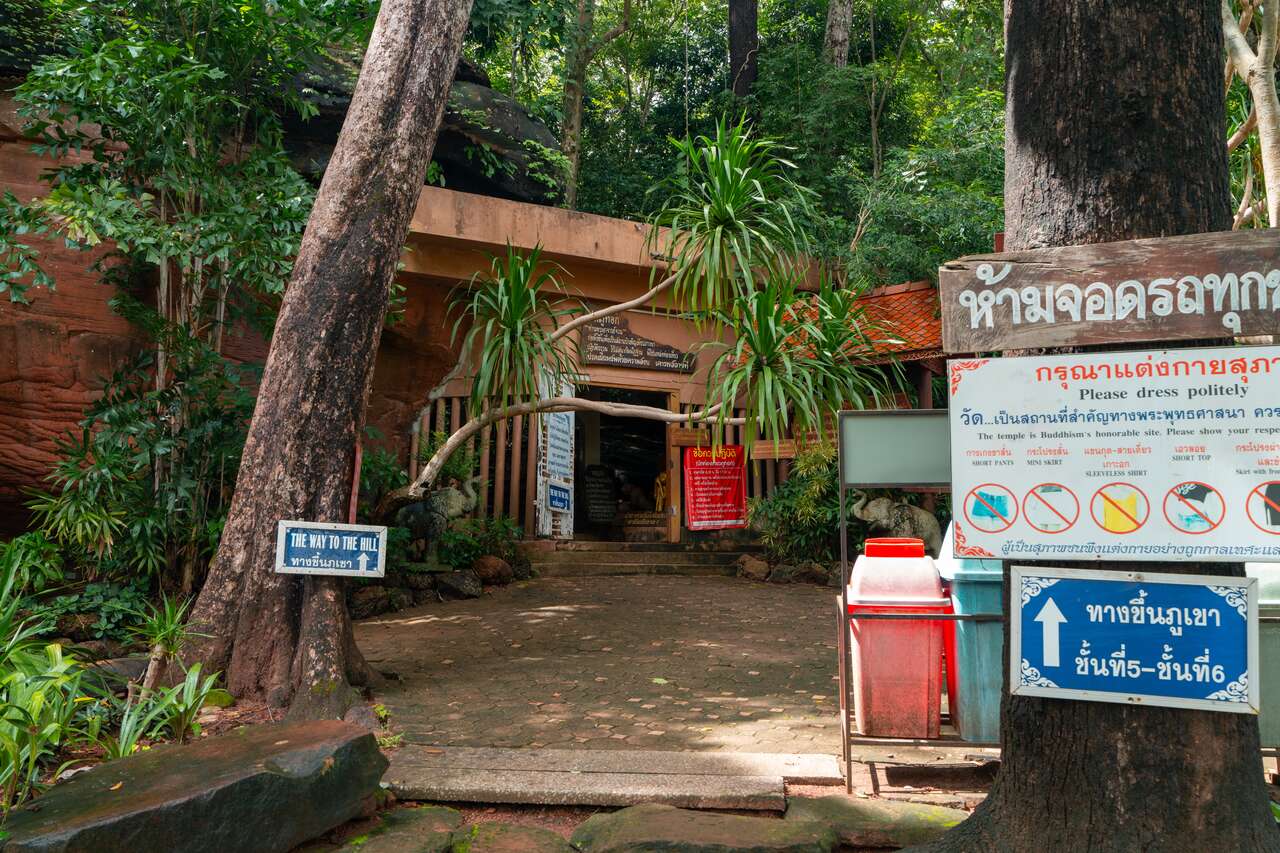
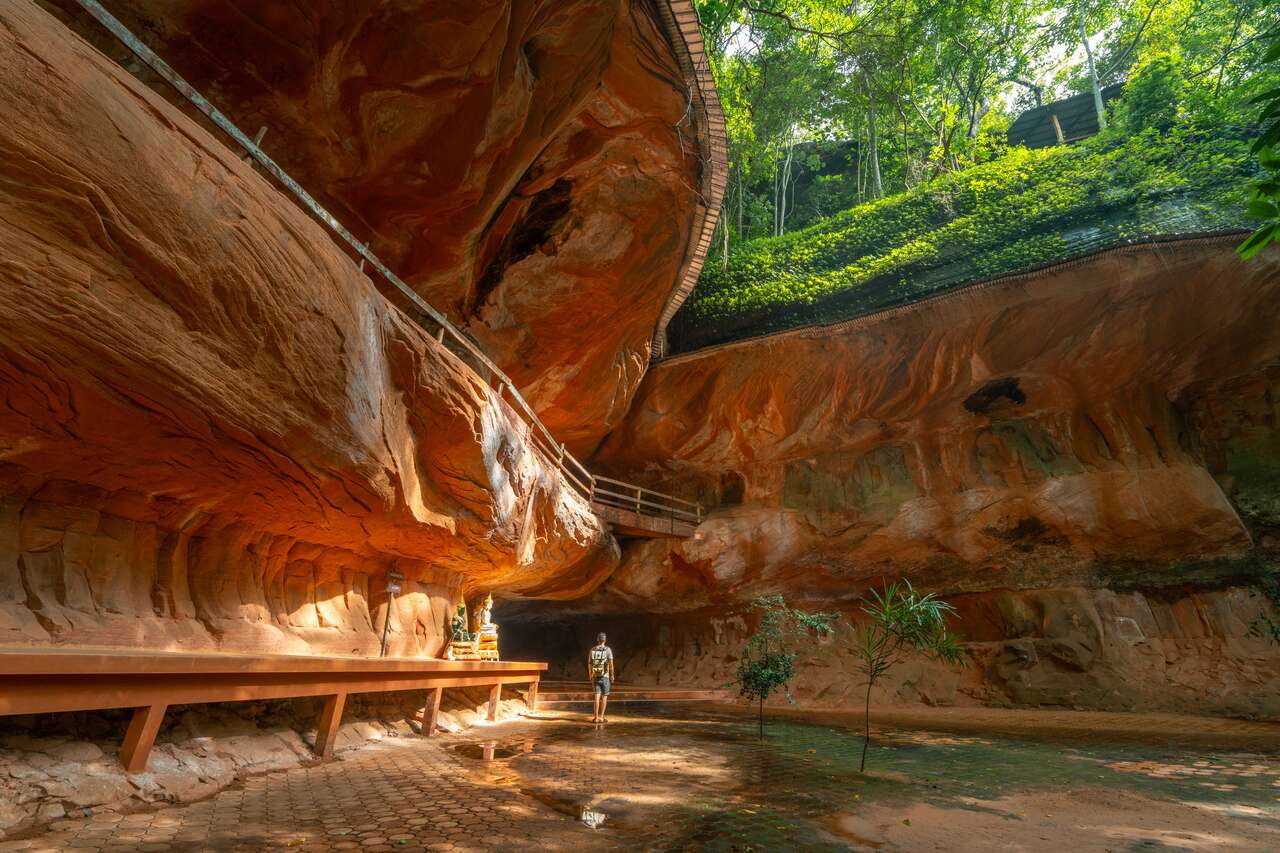
Once you arrive at the temple, you can park your car on the temple grounds and head toward the trailhead to begin your hike up Phu Thok. Before you start, consider visiting the temple museum, which is dedicated to the monk who founded the temple. The museum even features some unique cave-themed decor inside. It's well worth a look.
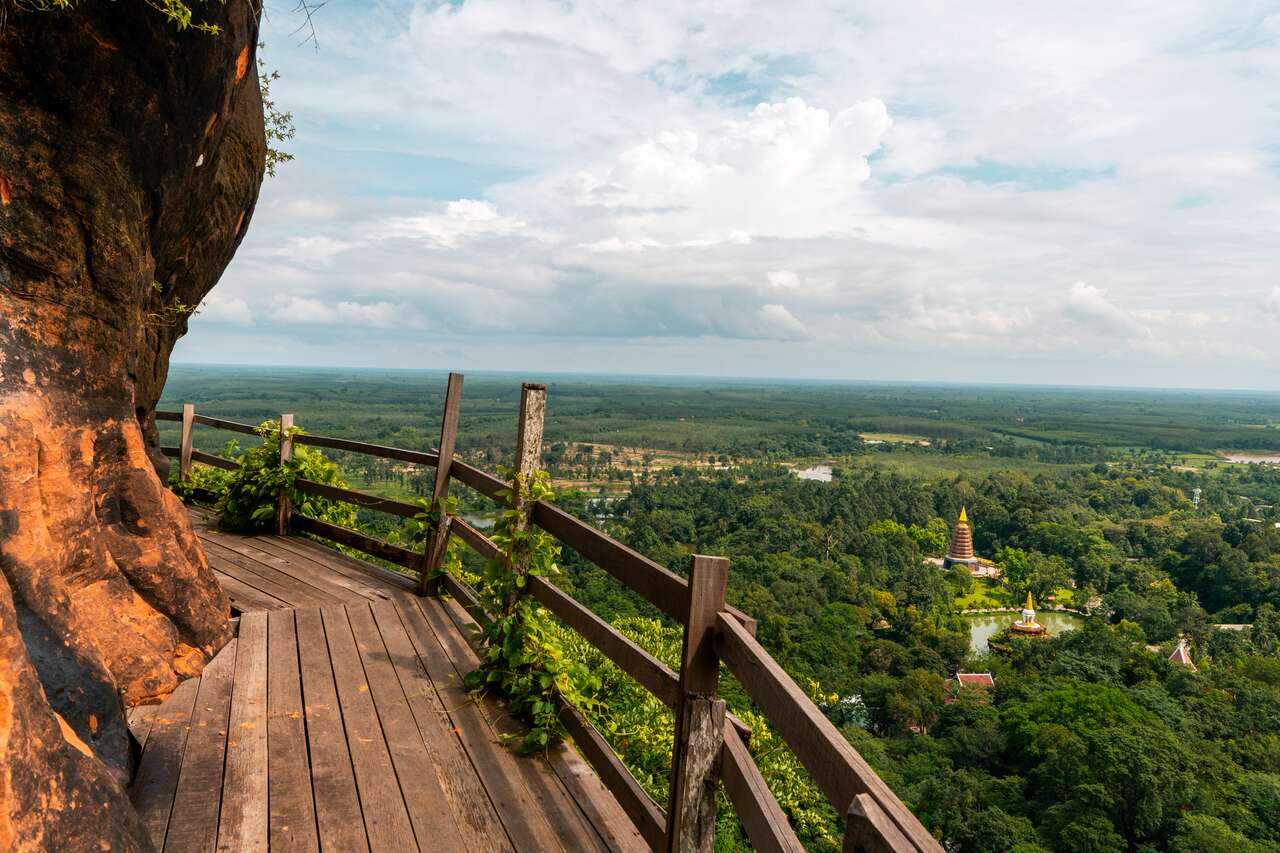
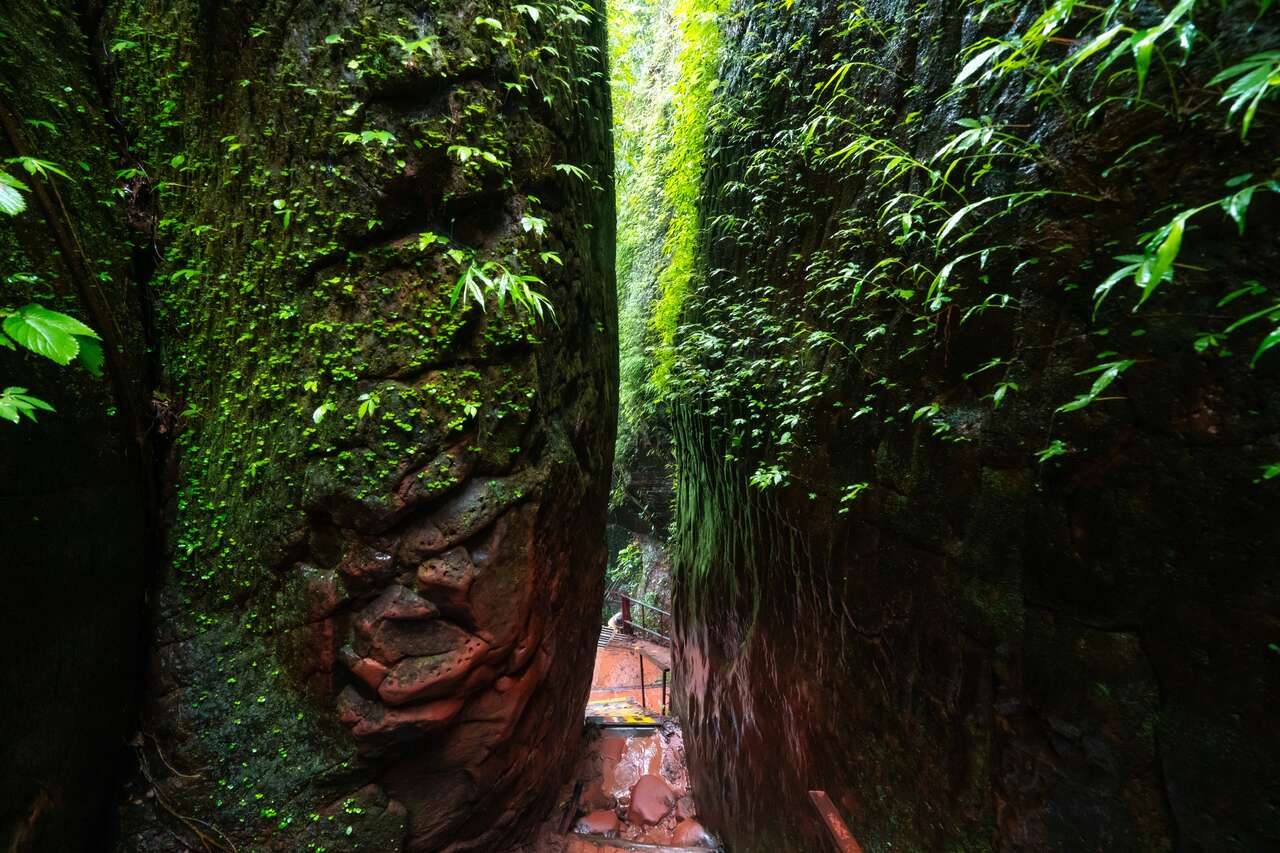
The mountain is divided into seven levels, symbolizing the seven levels of heaven in Buddhist cosmology. The hike becomes steep quite quickly as you begin your ascent. It takes about 10 minutes of steady, uphill climbing without breaks to reach Level 4, where the view opens up and you’re rewarded with panoramic scenery all around the mountain.

You can continue up to Level 5, where you’ll have the option to start walking around the mountain along the wooden cliffside walkways. Level 6 also offers some nice views, but Level 7 isn’t really worth the climb, unless you're curious like I was. I went all the way up, only to find dense forest, no viewpoints, and no proper walking paths… just trees and the occasional snake. So save your energy, Level 5 and 6 are where the real highlights are.
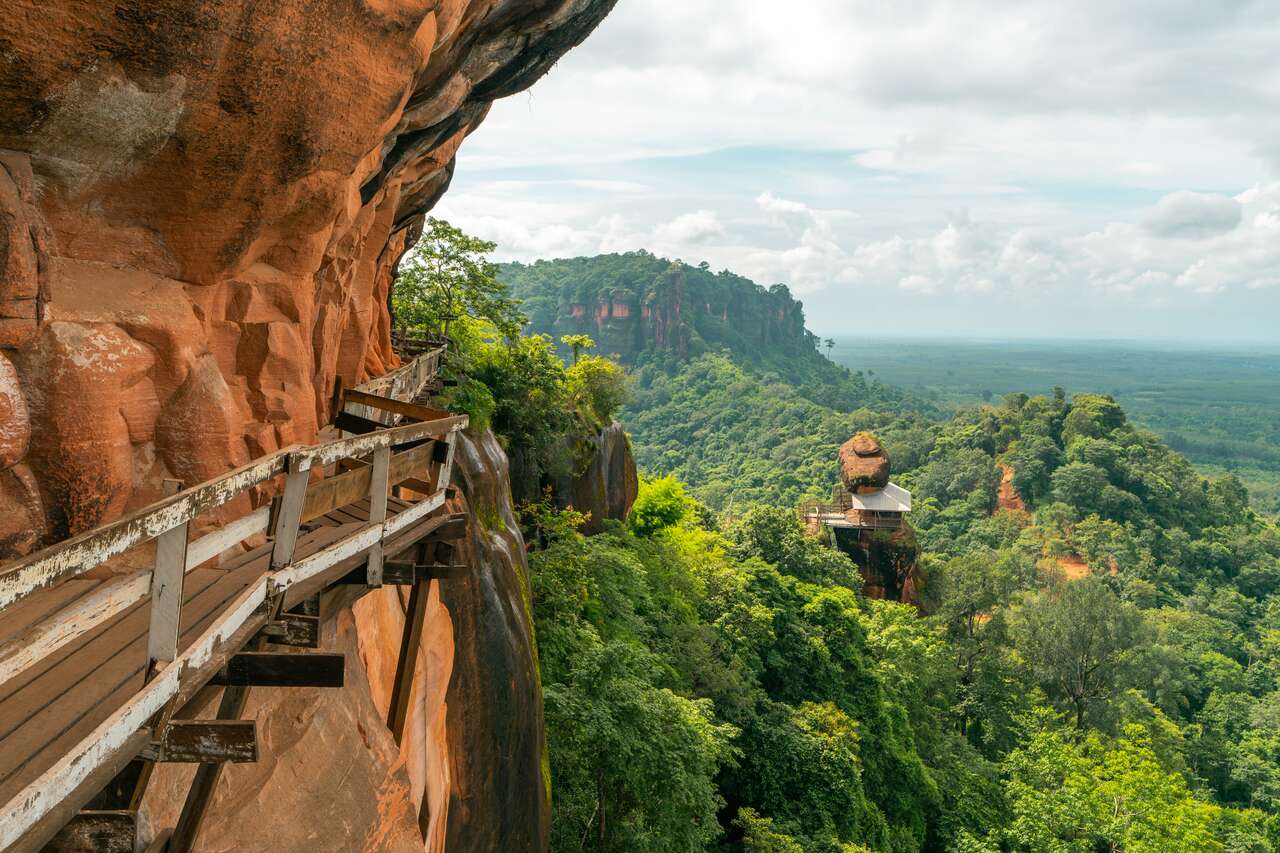
As you walk around the mountain to the other side, you will see a shrine built on top of a lower mountain that is connected to Phu Tok by a bridge. This is a great viewpoint to see, as you will be able to see Phu Tok from afar and all its glorious wooden walkway.
The shrine also offers a beautiful view of the surrounding mountains. I loved sitting there as the wind swept in from all directions, making it the perfect spot to cool down after the hike and enjoy the peaceful atmosphere. If you’re hiking Phu Thok, be sure to make your way all the way to the shrine. It’s well worth the effort.
The entire mountain is full of stunning corners, and I highly recommend you make your way around the mountain so that you can see all the beautiful hidden corners of this place. I spent over 2 hours hiking around Phu Tok, and I was mostly the only one up there. It was incredible. You can expect to spend at least 1.5 to 2 hours here.
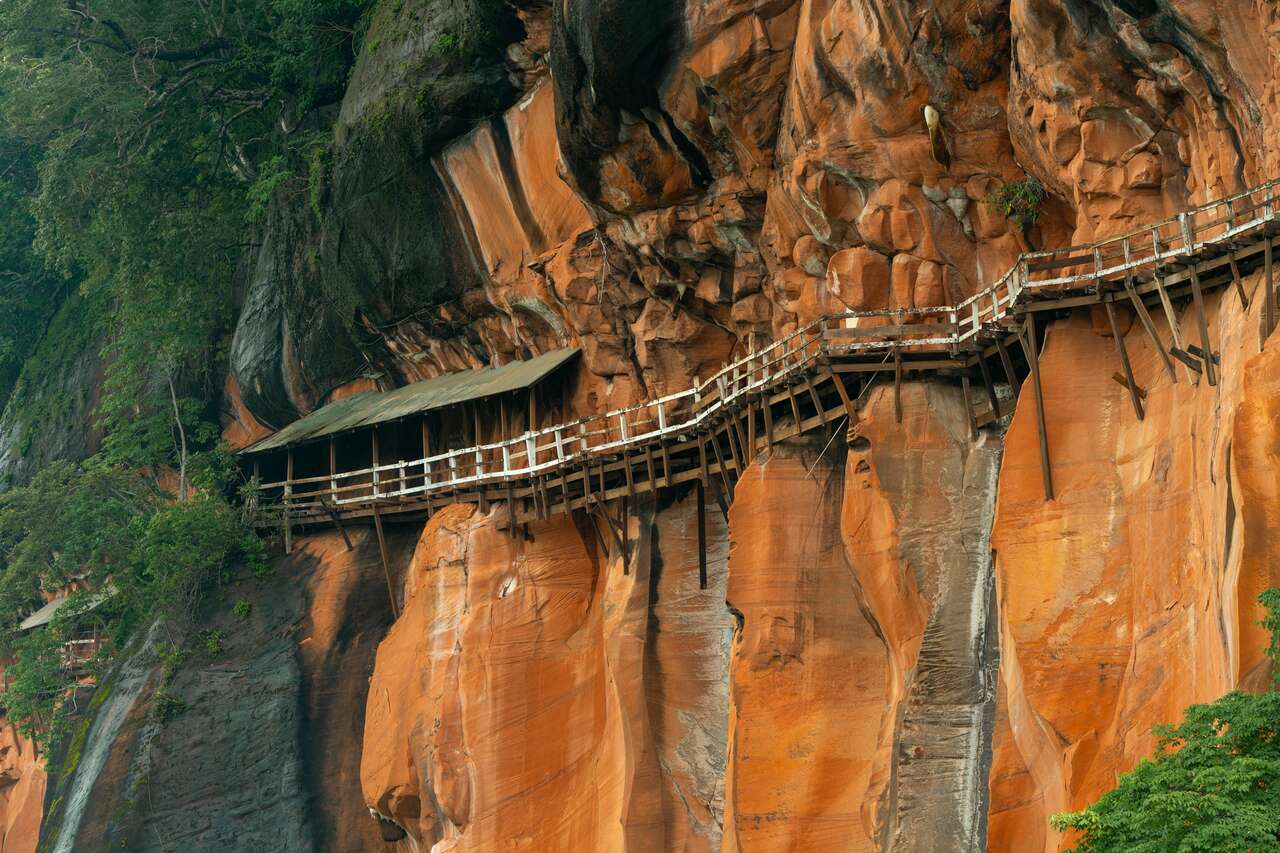
Since the walkway is made of wood, some sections may feel a bit unstable, so be sure to walk carefully and tread lightly. Also, keep a tight grip on your phone and belongings! If you drop anything through the gaps in the wooden path, it’s a sheer drop into dense forest below, and there’s no getting it back.
I cannot stress just how much I love this place. If you are traveling to Bueng Kan, you have to make it to Phu Tok Temple. The temple is open from 6:30 AM to 5 PM daily. It's a long hike, and it can be pretty hot and humid here, so be sure to carry a water bottle with you.
5. Spend half a day exploring Naka Cave
- 📍 Location: Naka Cave [Map Link]
- 🕐 Opening Hours: 6 AM - 2 PM
- 💰 Entry Fees: 30 THB (~0.9 USD)
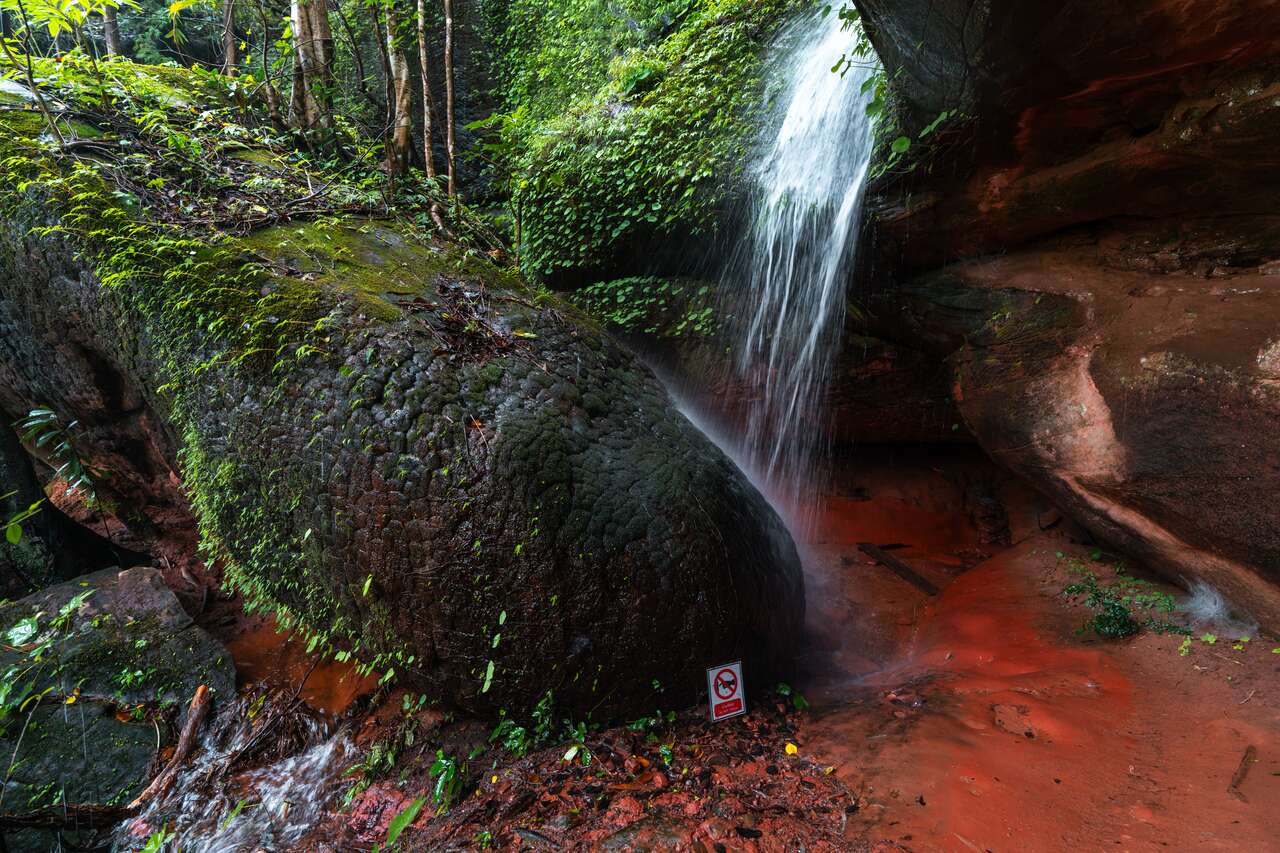
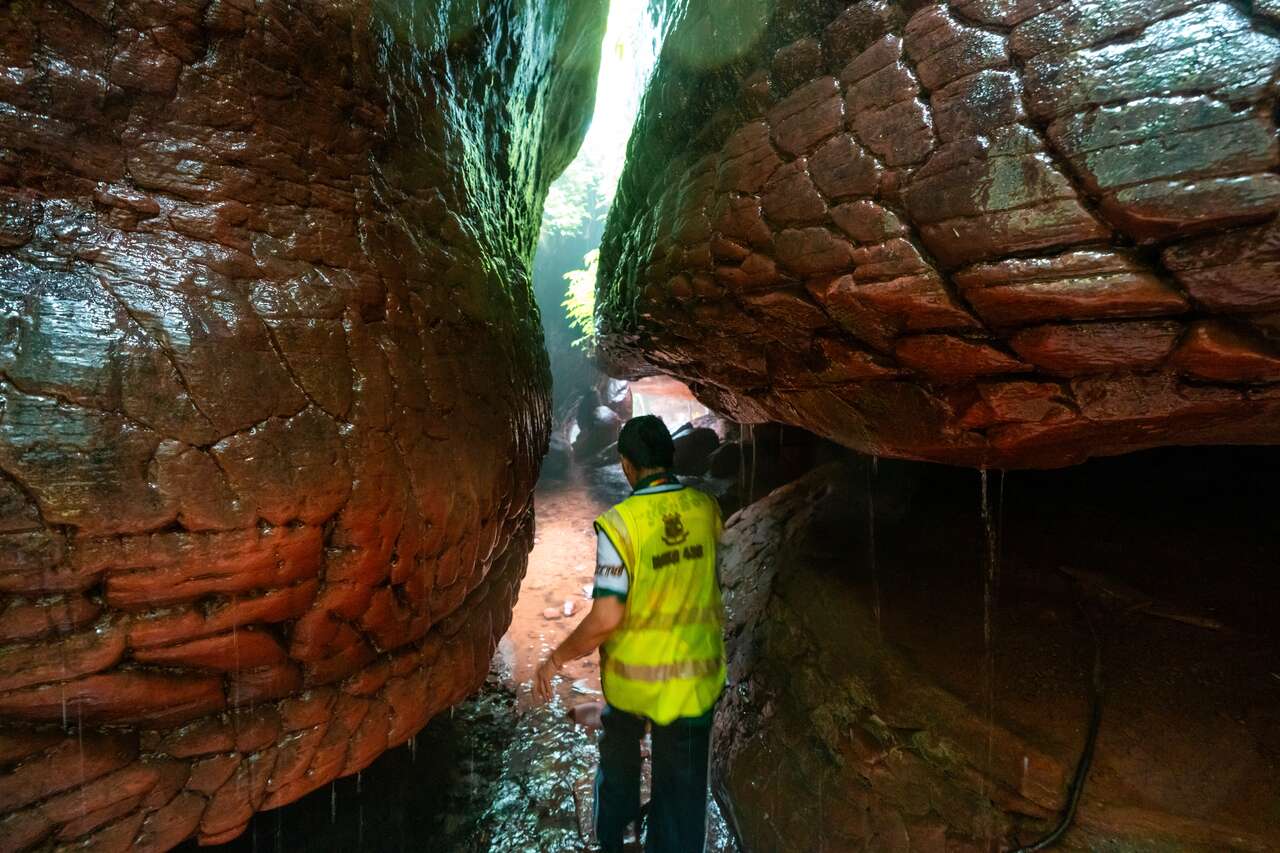
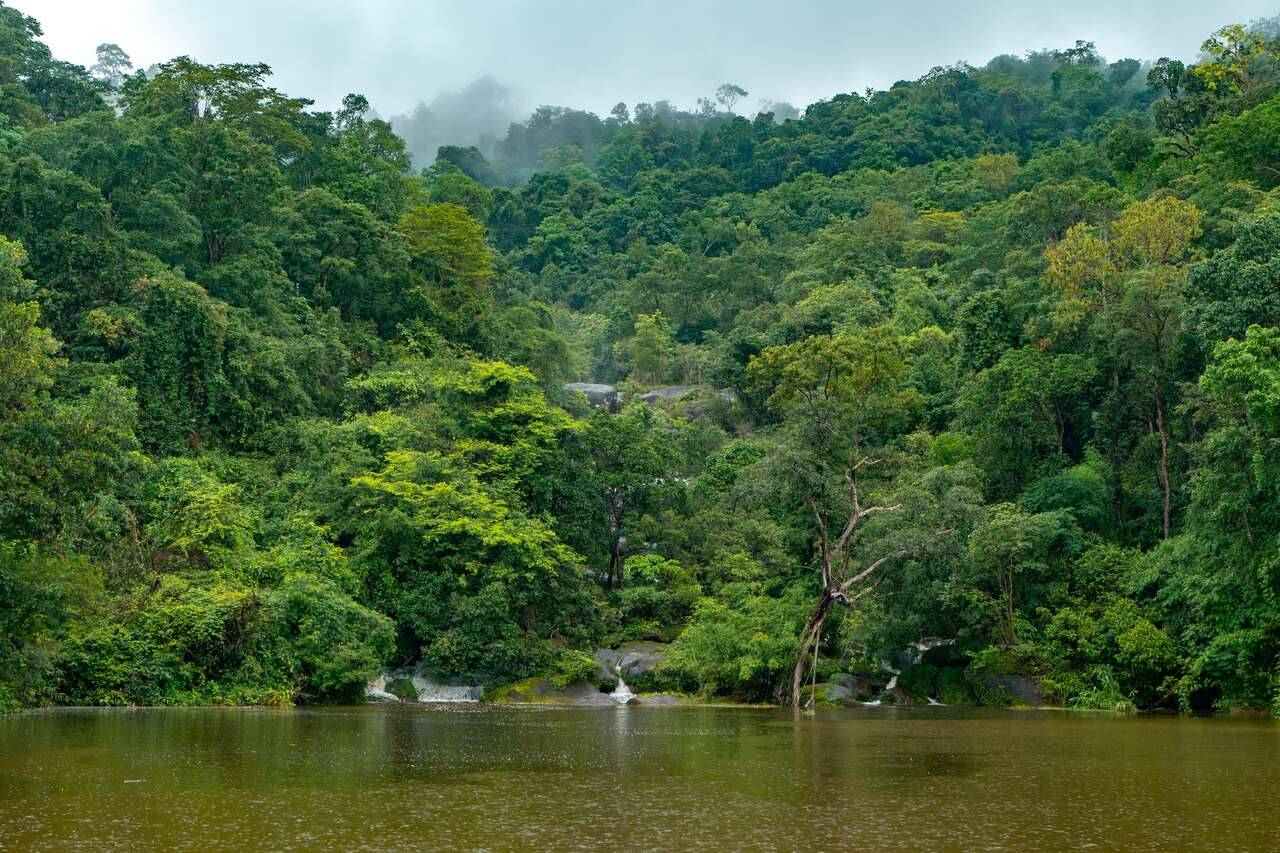
Now for the highlight of Bueng Kan, visiting Naka Cave, one of the province’s most famous attractions. This sacred site is highly revered by both the Thai locals, and it is believed to bring you luck and wealth if you hike to it and pray. Why is this cave sacred? Well, for one, the whole mountain where the cave is located has some really surreal rock formations.
The cave is called Naka or Naga Cave because of its striking snake-like appearance. In case you’re not familiar, a Naga is a mythical serpent-like being found in both Hindu and Buddhist mythology, and many features around this site resemble it.
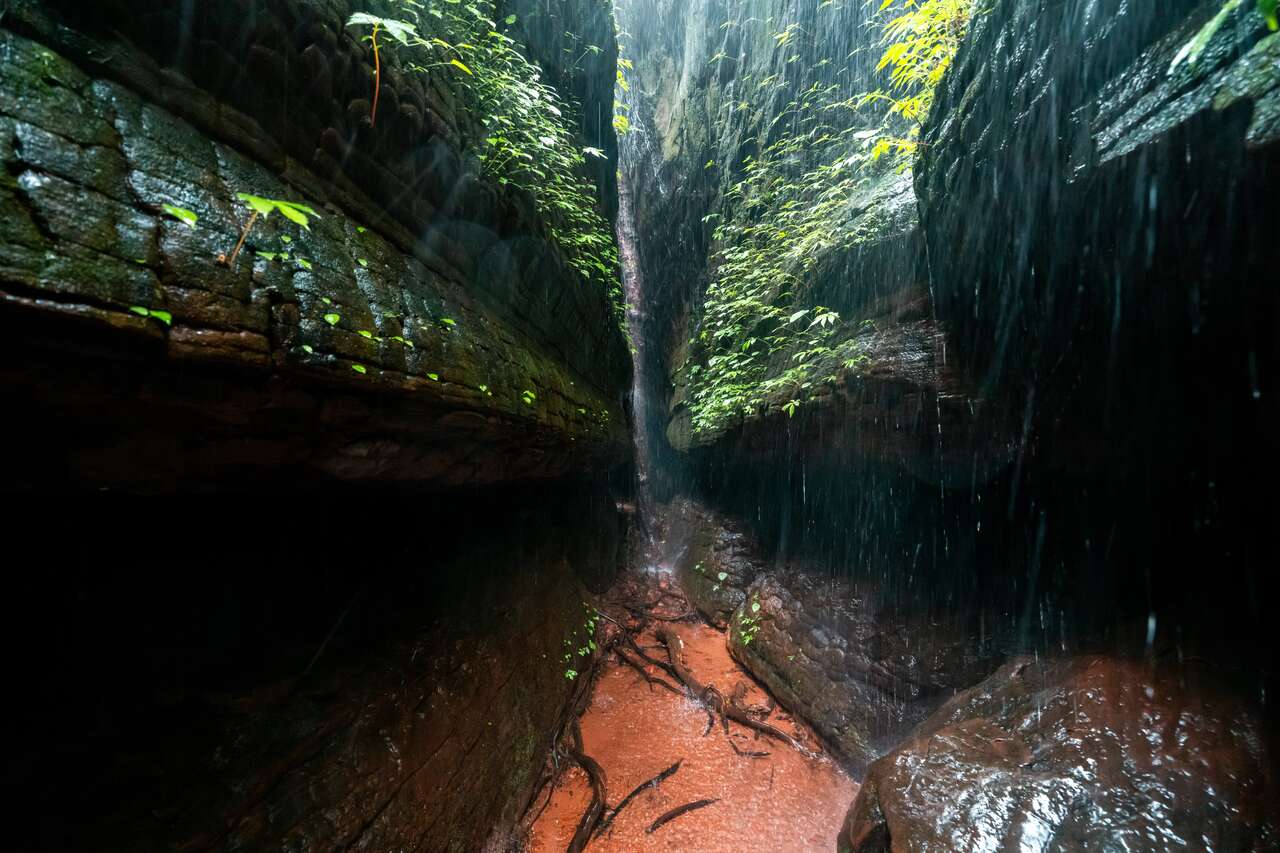
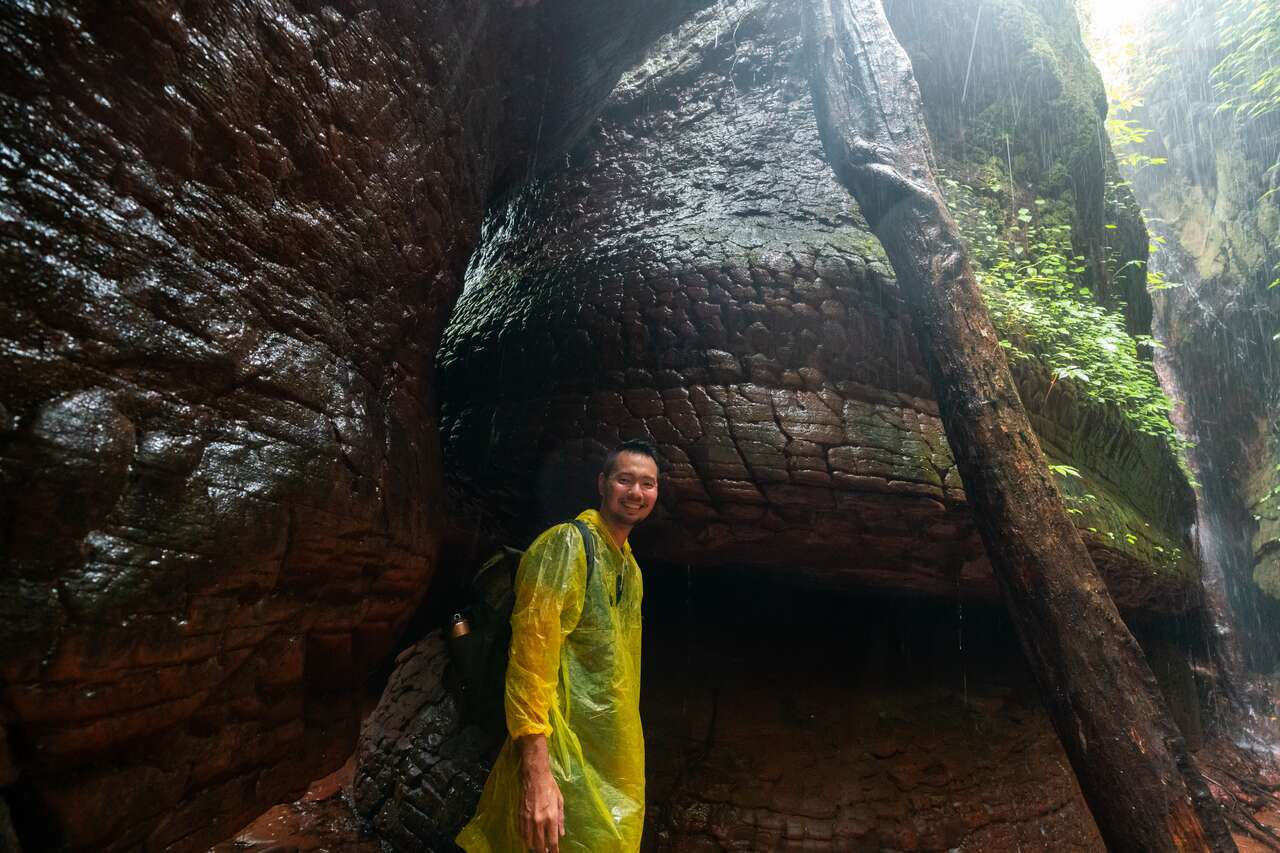
Inside Naka Cave, for example, you’ll see a massive “snake body” rippling across the cave walls, complete with what looks like a serpent’s head and scale patterns, formations naturally created over millions of years through thermal cracking and erosion.
That said, the Naka Cave is not the only place to see here. The entire mountain is part of the Naka Cave attraction with many awesome sites to see, trails to hike, and viewpoints to enjoy. That is why in order to visit Naka Cave, you will need to hire a local guide to guide you through each spot. They will not just explain the history, but also point out certain features like all the "heads of the Naga", or rock formations that look like the Naga's head, and so much more.
Hiking alone is not allowed, so you’ll need to hire a guide to visit Naka Cave. Thankfully, the management here is well organized, with plenty of on-site guides available for walk-in visitors like me. The guide fee is 500 THB per group of about 6 to 7 people. You can try waiting for other tourists to join and share the cost, but unlike at the Three Whales Rocks, most Thai tourists come with pre-arranged groups booked online. If you don’t speak Thai, don’t worry, you can still walk in and get a guide on site.
I waited about 30 minutes for other tourists to join, but when no one showed up, I decided to hire a guide on my own. It actually turned out better than sharing, the guide was able to focus entirely on explaining all the fascinating details about the cave, and we kept the same pace without having to wait for anyone else. I’m really glad I went solo with the guide.
Considering the experience you get, 500 THB is definitely worth it. Naka Cave isn’t a quick stop where you spend 30 minutes and move on, you’d be lucky to complete the entire trip in under 4 hours. Most visitors take at least half a day, as the hike to the cave is quite long, and there are plenty of other viewpoints to explore once you reach the summit.
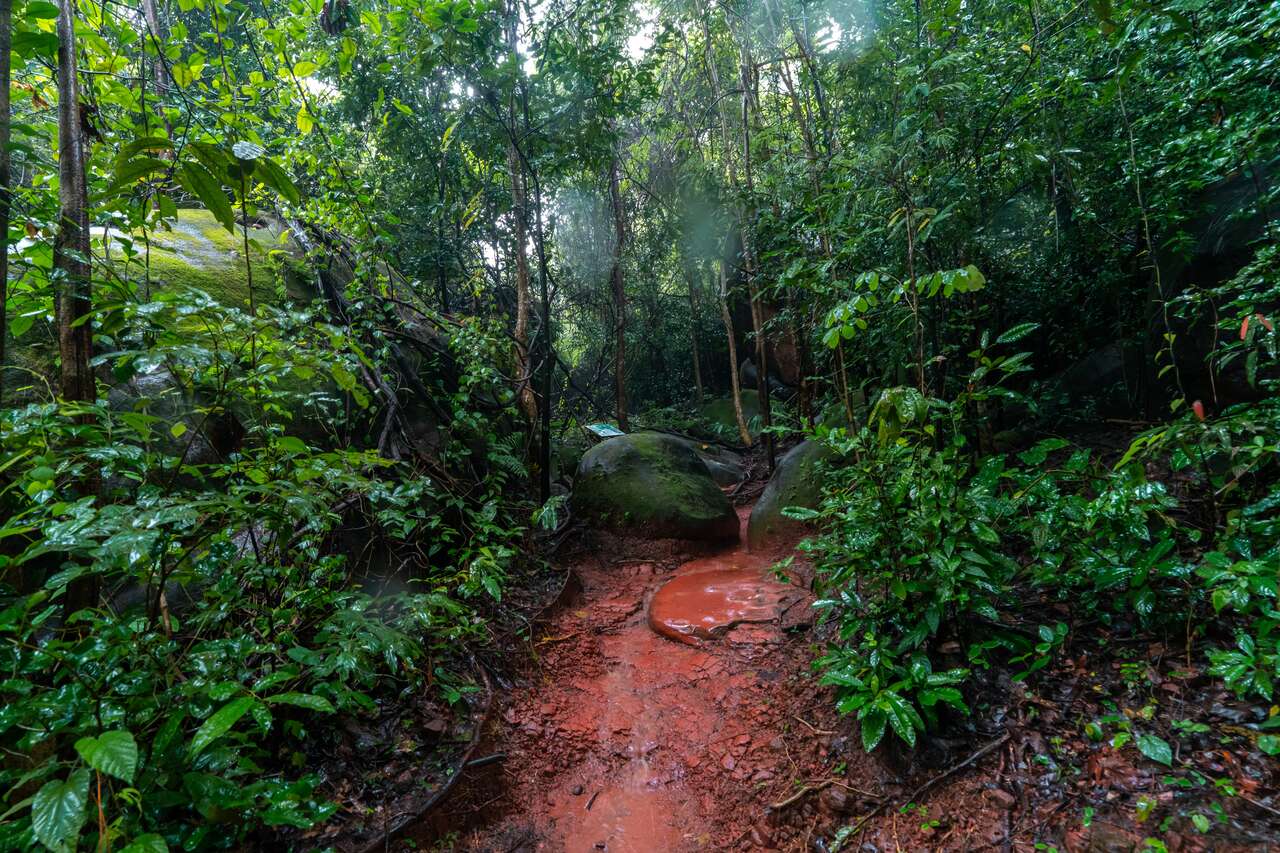
The hike starts with a gradual climb before quickly becoming steep, the steepest section takes about an hour to reach Naka Cave. Once you arrive, it’s mostly an easy stroll along the mountain summit to visit other viewpoints.
During the hike, you’ll spot many rocks displaying the snake-like patterns of the Naga, created by sun cracks. Keep an eye out for rocks shaped like Naga heads too. My guide and I found about eight during our trek. Some require a bit of imagination, but many are so very similar, it was surreal to see!

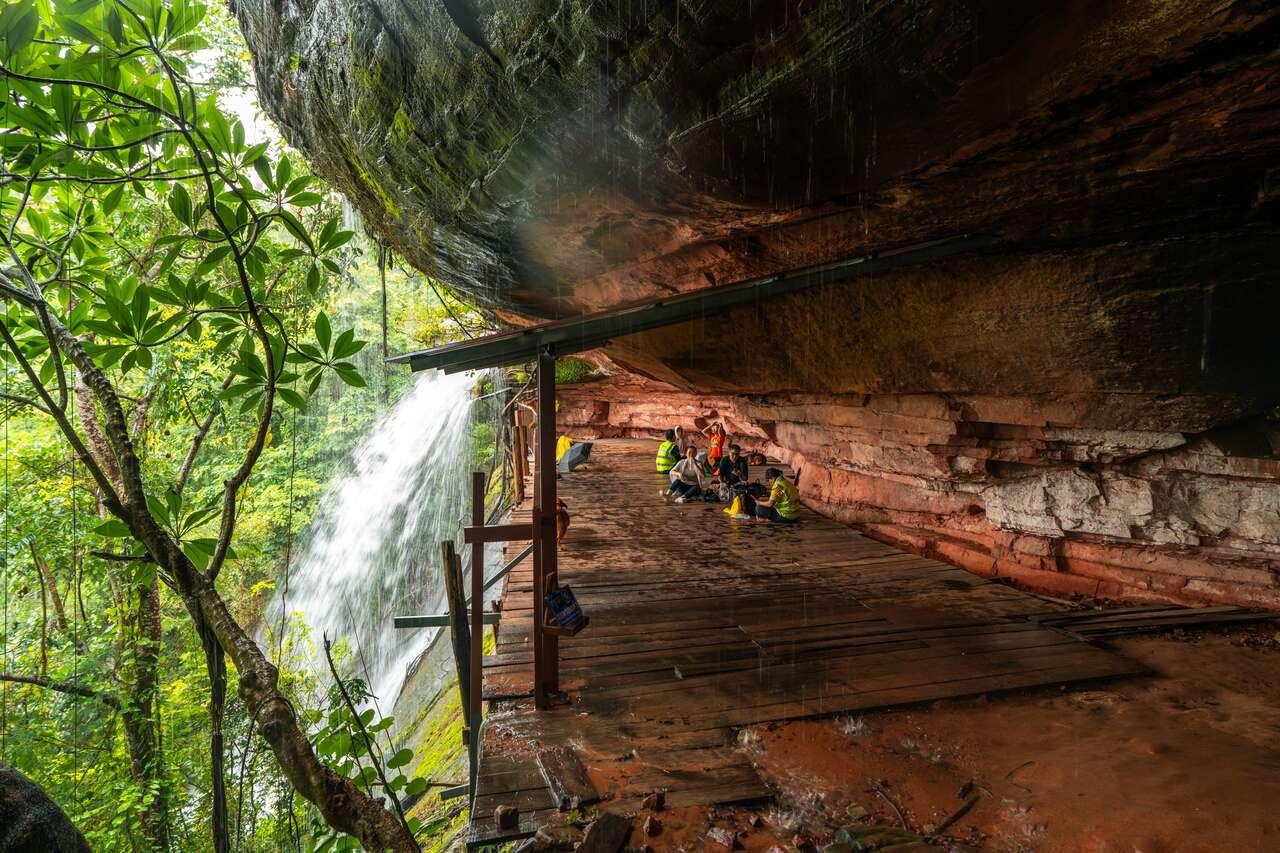
Up there, you will also find many viewpoints, but unfortunately I was there when it was raining heavily so I didn't get to see the view, but I gotta see the Naka Cave with waterfalls due to heavy rain, which is something not many people get to see. I'll take that as a win, despite all my clothes and camera gear were wet after this trip 😅.
If you are looking for a real adventure in Bueng Kan, Naka Cave is where you want to be. The place is open from 6 AM to 2 PM daily, and the entrance fee is 30 THB per person, 30 THB for parking, and 500 THB for the guide.
I recommend you get there by 7 AM so you can finish the trip before 2 PM, the closing time. Avoid coming anytime later than 1 PM as you won't have time to complete the whole trek. Also, prepare a poncho, enough water for a half-day hike, and wear proper shoes. You can't do this in flip-flops!
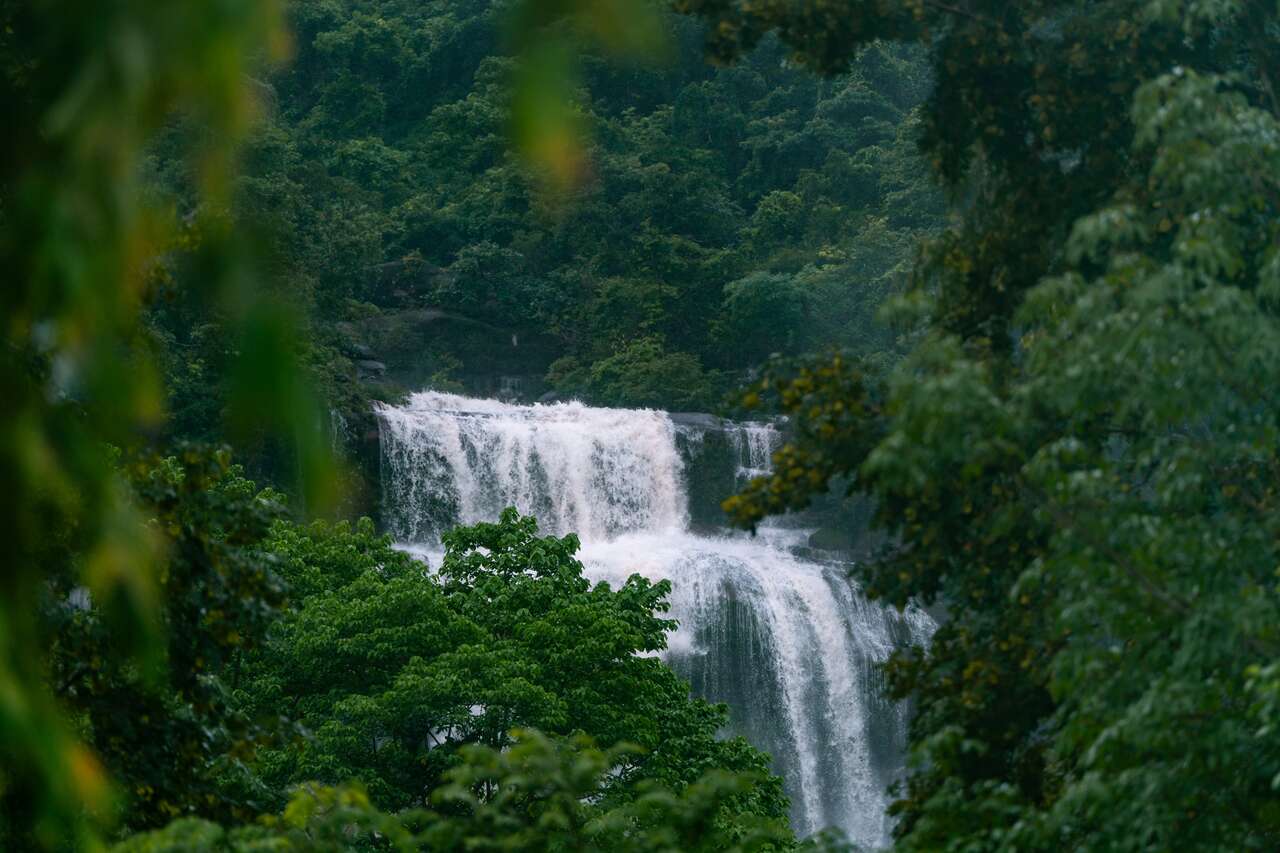
6. Hike to Tad Wimanthip Waterfall
- 📍 Location: Tad Wimanthip Waterfall [Map Link]
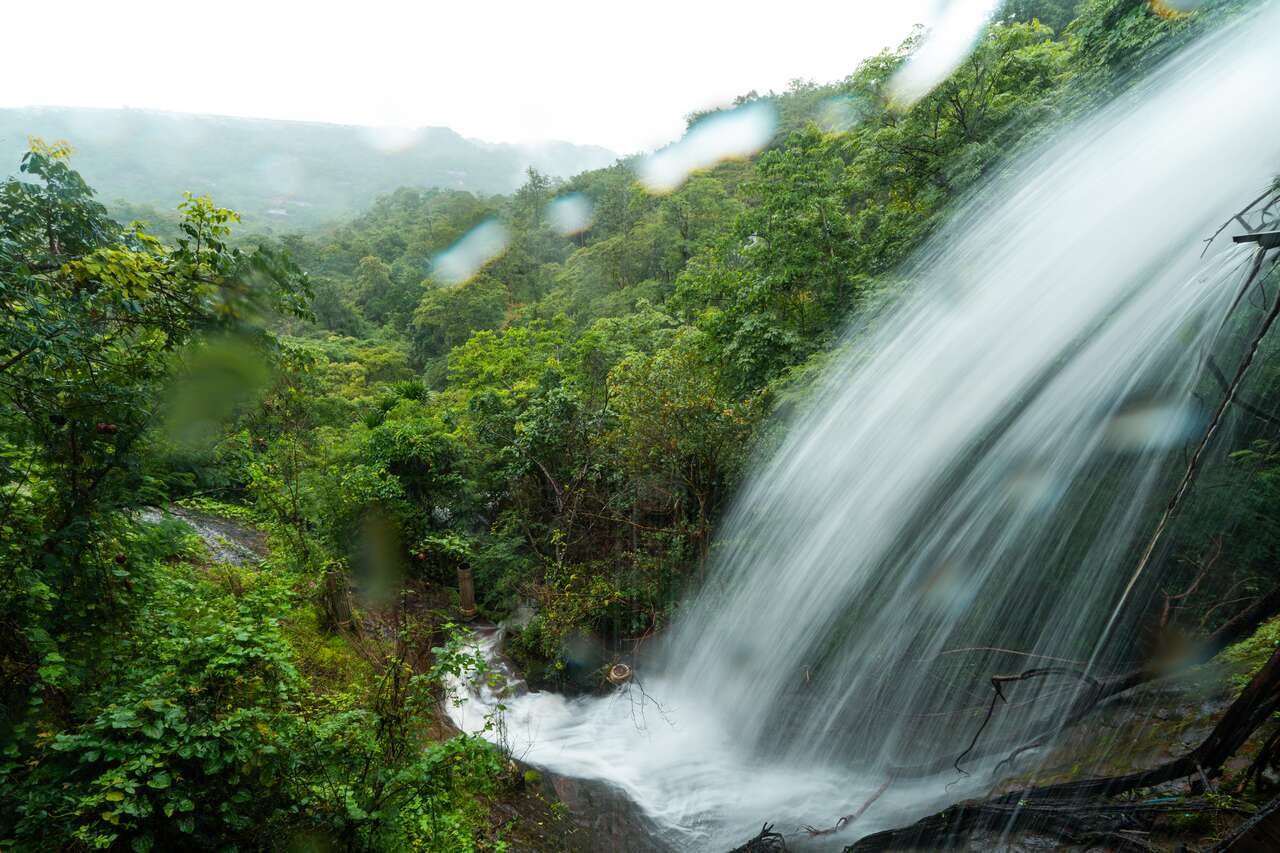
While you are hiking around Naka Cave, if you have time left, the guide can also take you to Tad Wimanthip Waterfall, a spectacular 7-tiered waterfall located not too far from the Naka Cave's trailhead. With a width ranging between 100–150 meters and a total height around 70 meters, it's one of the most breathtaking in Bueng Kan.

The waterfall is so big, you can actually see it even before you start hiking at the waiting area by the national park's entrance. The way there is a bit slippery, though, and when it rains, the guide will not take you there as it can get a little risky.
I was there when it rained the hardest, so I didn't get to see it up close. But if you are lucky and are able to see it on a nice clear day, be sure to let us know in the comments how it goes! 😉 All in all, it's a great side trip to make during your Naka Cave trip.
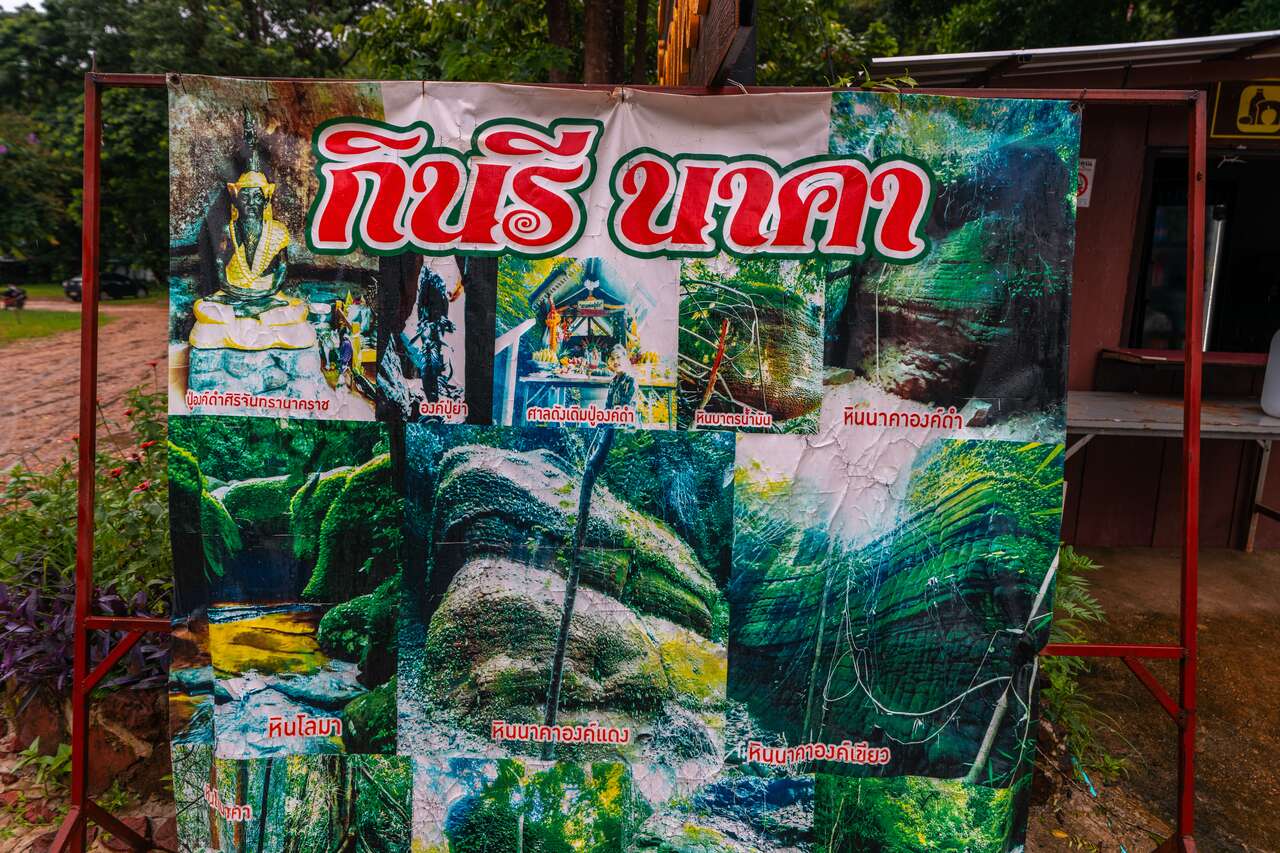
7. Check out Tat Kinnaree Waterfall & Dolphin Rocks
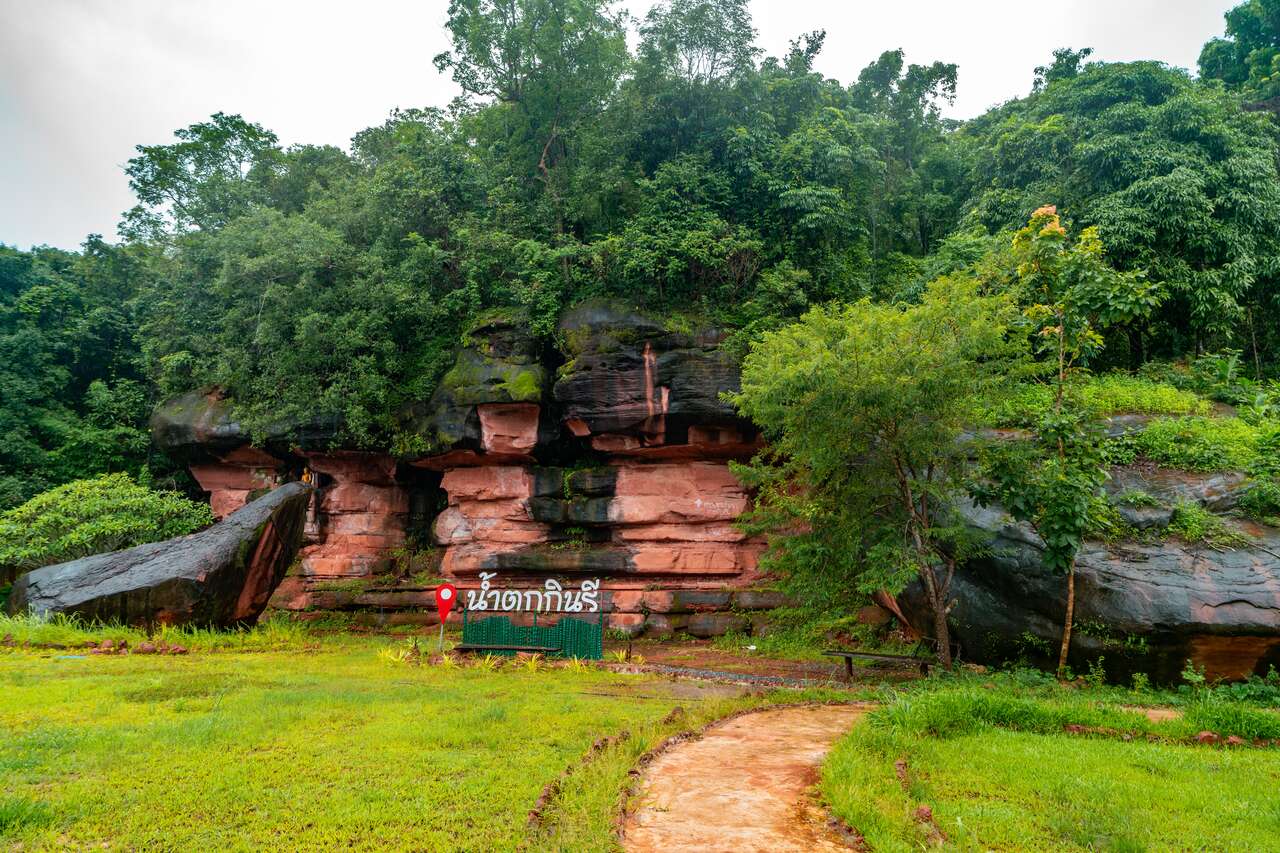
- 📍 Location: Tat Kinnaree Waterfall [Map Link]
- 🕐 Opening Hours: 9 AM - 3:30 PM
- 💰 Entry Fees: 100 THB (~3 USD) per person
Tat Kinnaree Waterfall is an impressive 5-tier cascade located not far from Naka Cave, making it a great stop as you explore the surrounding area. The waterfall is best known for the dolphin-shaped rocks on the upper tier, which you can reach with assistance from a local guide.
After entering the national park, it's about an 800-meter walk to reach Tat Kinnaree Waterfall. If you continue another 400 meters along a steeper trail, you'll arrive at Dolphin Rocks, a fascinating cluster of rock formations that resemble dolphin heads gathering around a natural pool.
I wish I had been able to see this part of the waterfall, but due to heavy rain that day, the trail was flooded and the area closed, so I could only view the falls from afar. If you have better luck with the weather, be sure to stop by and explore the trails around Tat Kinnaree Waterfall.
Be prepared to get wet on this hike! The park is open daily from 9 AM to 3:30 PM. Entrance fees are 100 THB per person, 30 THB for a car, and 200 THB for a local guide, which is mandatory if you wish to hike to the Dolphin Rocks. Wear sturdy shoes and no flip-flops!
8. Enjoy Namtok Chet Si Waterfall
- 📍 Location: Namtok Chet Si Waterfall [Map Link]
- 🕐 Opening Hours: 8:30 AM - 5 PM
- 💰 Entry Fees: Free, 30 THB (~0.9 USD) parking
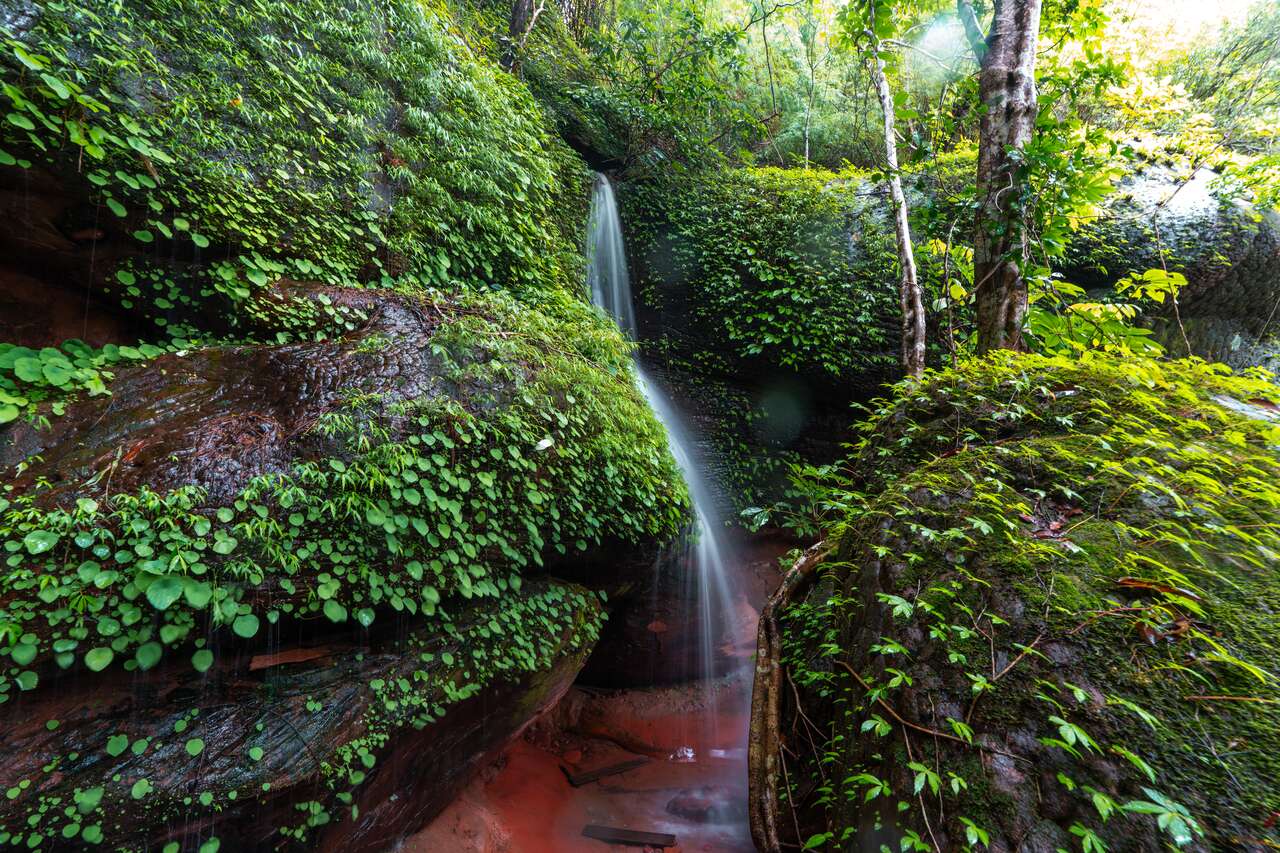
Another epic waterfall to visit in Bueng Kan is the Namtok Chet Si Waterfall, also known as the Seven-Colored Waterfall. This multi-tiered cascade flows over a wide sandstone cliff, forming natural pools at each level where you can swim. It gets its name from the rainbow effect created when sunlight hits the cascading spray, producing vibrant bands of color in the mist.
This waterfall is best visited between July and October during the rainy season, as there won't be a lot of water outside this period and it might not look as epic as it should. Once you arrive at the car park, you will have to hike for about 20 minutes on an 800-meter trail before you arrive at the first tier of the waterfall. You can hike on to other tiers from here.
Unfortunately, I ran out of time on this trip and didn’t get a chance to visit, but if you do, be sure to drop by and check out the waterfall. It’s open daily from 8:30 AM to 5 PM, with a 30 THB parking fee and free entry.
9. Swim at Tham Phra Waterfall
- 📍 Location: Tham Phra Waterfall [Map Link]
- 🕐 Opening Hours: 8 AM - 4 PM
- 💰 Entry Fees: 200 THB (~6 USD)
Tham Phra Waterfall is another must-visit spot while exploring Bueng Kan. This 3-tiered waterfall is perfect for swimming, as the water cascades down a wide sandstone cliff into large natural pools with plenty of space for you to swim. On the second tier, you’ll find a natural waterslide with its smooth rock channels that you can slide down with the flow of water.
Getting there requires a bit of effort though as once you park your car at the pier, you’ll need to take a 10-minute boat ride to reach the trailhead, followed by an 800-meter hike to the waterfall. The boat ride will cost you around 50 THB per person and it leaves when it's full.
Unfortunately, it was raining heavily during my visit, so the boats didn’t run and I couldn’t see the waterfall myself. If you do get to visit, please share your experience in the comments! I’m definitely planning to return to these spots next time I’m in Bueng Kan and will update the post with photos. The waterfall is open daily from 8 AM to 4 PM, and the entrance fee is 200 THB per person.
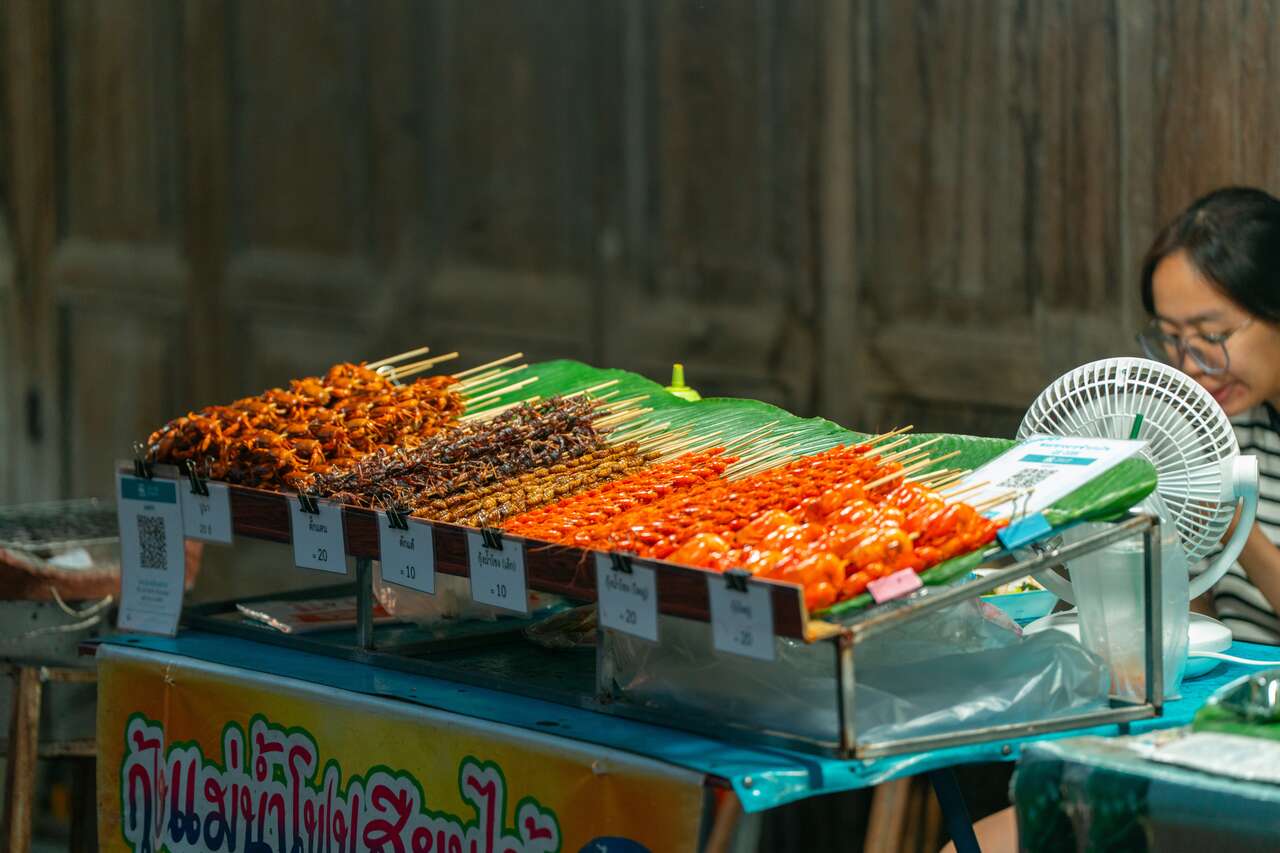
10. Visit Bueng Kan Walking Street
- 📍 Location: Bueng Kan Walking Street [Map Link]
- 🕐 Opening Hours: Fri-Sat, 4 PM - 8:30 PM
If you’re staying overnight in Bueng Kan City, be sure to visit Bueng Kan Walking Street, a charming riverside market where you can try all kinds of street food. The market is only set up on Fridays and Saturdays from 4 PM to 8:30 PM, so plan your trip accordingly.

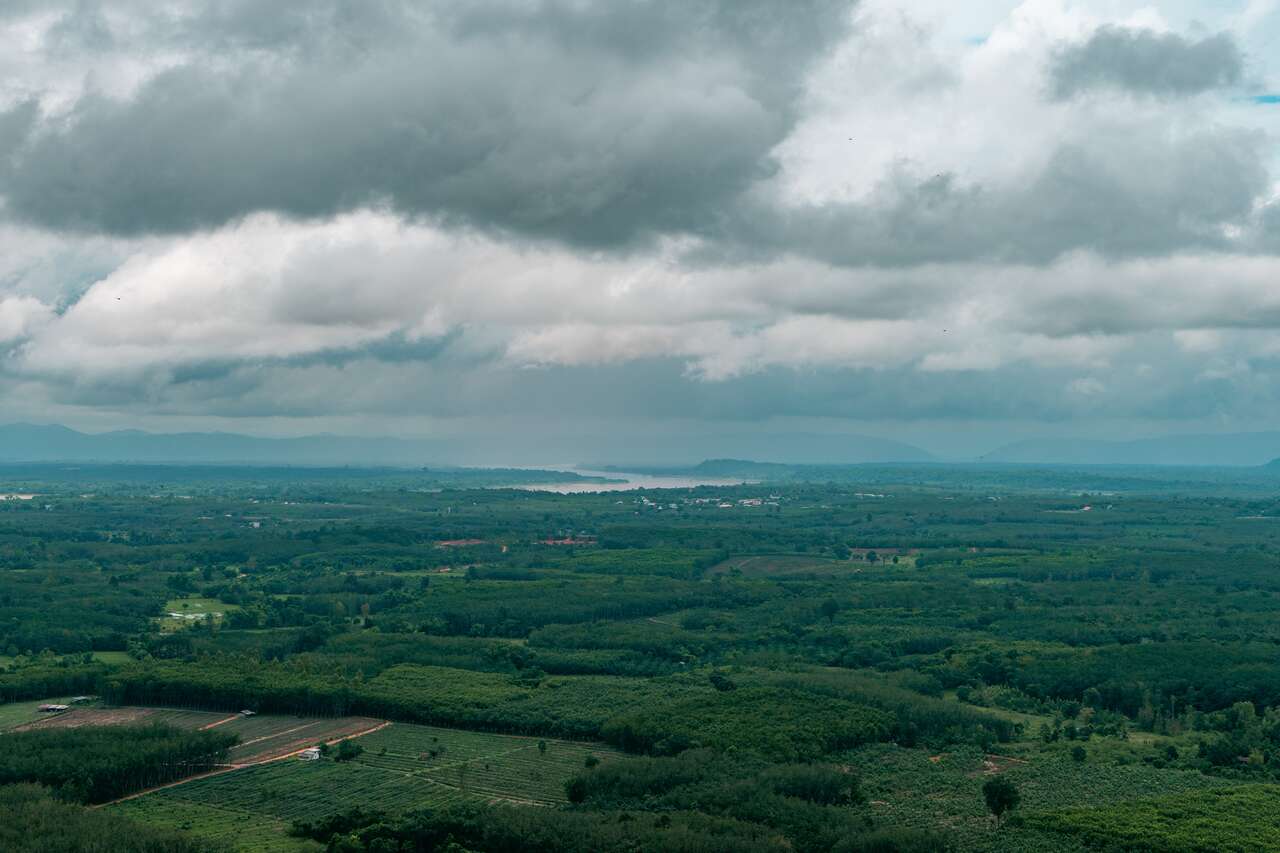
You can visit outside these days, but the market will be much smaller and less lively. Either way, it’s a great reason to explore Bueng Kan City, which, though small, offers a lovely view of the Mekong River and Laos on the opposite bank. Be sure to be there at sunset for the best experience!
How to Get to Bueng Kan?

By Flight: The fastest way to get to Bueng Kan is to fly from Bangkok to Udon Thani Airport operated by AirAsia and it should take about one hour. You can browse more flights via Skyscanner.
Once you arrive, you can rent the car from the airport and drive to Bueng Kan, taking about 3 hours. Bueng Kan doesn't have an airport so this is the fastest way to get here. You can rent a car through DiscoverCars.
By Bus: You can also take a bus from Bangkok to Bueng Kan, but you will have a hard time finding a place to rent a vehicle to get around the province. If you insist, the bus typically leaves from Morchit Bus Terminal and it will drop you off at Bueng Kan Bus Station in about 11 hours. The price is about 850 THB and you can find the schedule and book online here.
By Car: If you have a car or are renting one, you can also drive from Bangkok to Bueng Kan. The journey should take about 10 - 11 hours depending on the traffic. A bit faster than the bus and you can stop at any places along the way. You can rent a car through DiscoverCars.
How to Get Around Bueng Kan?
By Car: The best way to get around in Bueng Kan is to rent a car and drive. You should be able to rent a car from Udon Thani Airport or you can rent one directly from Bangkok Airports and make the journey from there. It's a long drive, but if you have time, there's a lot to see along the way. You can book a rental through DiscoverCars.
Disclosure: This post may contain affiliate links.